Showing posts with label Fruit. Show all posts

Saturday, 30 March 2013

Hot Cross Buns (Delia Smith's)


Happy Easter!
Easter and you think of sun and blue skies; April Showers (rain); young lambs frolicking in the fields; fluffy chicks; new beginnings; lots of chocolate and my favourite of all - Hot Cross Buns.
My mum enjoys these too and I remember making these when I was younger - they often turned like rocks the next day though.  Large supermarkets have in-store bakeries that churn out stacks and stacks of these buns so it's cheap and easy to buy them these days.

I saw something intriguing on another blogger's post, it was Cook Like A Star where a celebrity chef is chosen and participants cook any dish by the said chef.  This occasion it's the turn of Delia Smith in the spotlight.  I have watched Delia Smith on TV cookery programmes from when I was a child and some of my favourite cake recipes are in fact from one of her books.  So what better excuse to look up recipes to cook and join in the blogging and cooking fun!
(Thank you Anncoo for your delicious post on Chocolate Drop Mini Muffins with Red Noses - as that is where I saw the Cook Like A Star blog hop event!)

Hot Cross Buns (recipe adapted from Deliaonline - Hot Cross Buns)


Ingredients
450g strong bread flour
50g caster sugar
5g salt
7g easy-bake yeast
125g dried mixed fruit (raisins, sultana, currant & mixed peel)
1 tsp ground cinnamon
50g butter
1 egg
50ml milk
150ml water
Crosses
3 tsp plain flour
3 tsp water
Glaze
1 tsp honey
2 tsp warm water

Sift flour, salt and cinnamon into a mixing bowl and add the sugar, yeast and dried mixed fruit. Stir to mix everything together and make a well in the centre.

Melt the butter in a jug, add the milk, crack the egg in and mix together.  Pour this into the dry ingredients, add most of the water (saving a couple of tablespoons back in case dough gets too wet), mix with a spatula until a dough begins to form, then put your hand in to squeeze and bring everything together.

Transfer dough to a clean surface and knead until it feels smooth and elastic - about 6 minutes.  Pop it back into the bowl, cover the bowl with a lightly oiled sheet of cling wrap and leave in a warm place to double in size (it will take about an hour).

Turn it out and knead lightly until it has returned to original size.  Divide dough into 12 equal pieces and roll them into balls.  Place them on a lined baking sheet leaving room for them to rise.  Cover with the oiled cling wrap and leave to rise again (about 25 minutes).

Preheat the oven to gas 7 / 220 C / 425 F.

Mix the plain flour with the water in a small bowl to a smooth paste.  Use this to gently pipe crosses onto the risen buns.

Bake the buns for about 15 minutes.

Mix the honey with the warm water and brush the buns when they are hot from the oven to make them shiny and sticky.

Transfer to a rack to cool.


This is my submission to the blog hop event Cook Like A Star (March 2013) organised by: Zoe (Bake For Happy Kids), Baby Sumo (Eat Your Heart Out) and Mich (Piece of Cake)


Wednesday, 6 March 2013

Tea Loaf Cake


I don't often buy shop-bought cake whether it is a mass-produced branded one or supermarket own brand. I find them a bit dry, a bit sweet for my liking.  Hubbs (Mr Leaf) likes them though.  When they come individually wrapped in slices they are convenient for him to take to work and on special offer - well, I treat him :p  They do a light fruit cake one which has notes of mixed spice and is rather delicious if I may admit!  I tried creating my own...

Tea Loaf Cake

150ml boiling water
1 Earl Grey Tea Bag
250g mixed dried fruit
200g soft butter
75g caster sugar
75g soft light brown sugar
3 large free-range eggs
1 zest of an orange
40g ground almonds
210g self-raising flour
1 level teaspoon baking powder
1.5 level teaspoon mixed spice

Put fruit into a small bowl, tuck in the tea bag and pour on the boiling water.  Leave the fruits to swell and soak up the liquid.
Preheat oven to 180C/350F/Gas 4

Grease and line 2 small loaf tins.  I used a rectangular aluminium foil container and a 2lb loaf tin.

Cream the butter with the sugars until light and fluffy.

Add an egg into the mix along with a spoonful of your measured flour, mix until the egg has been incorporated.  Repeat with the remaining eggs.

Tip the fruits along with any liquid into the cake mix, give the tea bag a good squeeze. I emptied the bag of it's leaves into the cake mix as I thought it might improve flavour.  Add the grated orange zest and the ground almonds and fold in.

Sift the flour, baking powder and spice into the bowl, fold to combine.

Spoon into the greased tins and bake.  My loaf tin took 45-55 minutes and the smaller aluminium container took 35-45 minutes.  If the cakes brown too much, lower the heat slightly.  When you are checking the cake, give the tin a shake.  If the mixture wobbles, cake is not ready and may need another 10 minutes before you check.  Use a skewer to test the cake in the centre any gooey wet mix indicates cake is not ready and may need a further 5-10 minutes.
Sprinkle a little caster sugar on top of the cake when done, or dust with icing sugar.  Leave cake in tin for 10 minutes before cooling on rack.


*** Verdict
Not the same as the mass produced one which is lighter in colour (I suspect the tea leaves in my cake give it a richer colour) and I think if I stuck with one flavour instead of Earl Grey Tea and orange with the mixed spice it might resemble the bought-cake.  Nevertheless, my mummy friends all enjoyed the cake and at least I am happy eating something I know I made (even if hubby eats the plastic wrapped version!) :)


Tuesday, 12 June 2012

Chiffon Cake Photos II


These are taken from the digital camera - hopefully better picture quality than the camera phone!


Here is a Gluten-Free Lemon Chiffon. I have a gluten intolerant friend and I made this cake as a treat for her.  She was having a stressful day decorating a 2-tier surprise birthday cake for her mum and I wanted to bring a smile to her.


This is the Mango Chiffon I created for my birthday.  It still stands fairly tall baked in a round springform tin despite not having a central tube to climb up on during baking.  I think this was a 9" cake.  It was also another gluten-free chiffon.


Ideally, I should've used more cream to top cake with but I wanted it to be not as sinful as I had a friend who was on a diet - too much cream and she may not even try it!


My gluten intolerant friend enjoyed the lemon chiffon so much she asked me to make another but fill it with cream, raspberries and strawberries for her partner's birthday.  I would like to have glazed the fruits but sometimes you have to go with what the customer wants!


Chiffon Cake Photos

These are a selection of photos taken from my camera phone (hence not great pictures and lighting).  Most have these have been celebration cakes and dressed with fruit and cream.


I made this as a surprise for a friend's 30th Birthday (July 2011)


This was for my niece's 3rd Birthday in March 2012. A Vanilla Chiffon, split in 3 layers.


Just to show you how tall my chiffon cakes usually rise - 4 egg mix in a 9" springform pan.


Mango Chiffon made for my birthday (April 2012).  Only a skimpy amount of cream as a friend was on a diet!


A Banana Chiffon I made for my mum's work - smells so good my son wants some!

Lovely, tall and airy.  I think I didn't invert this one quick enough as the top has dipped slightly and you can see the bubbles are squashed.  (Cake is inverted to serve so top of cake is actually on the bottom.)

Chiffon cakes can be successfully made using gluten-free flour! A lemon chiffon filled with fresh raspberries and cream as per my friend's request.


Saturday, 9 June 2012

Chocolate Refrigerator Cake

Can't believe how quickly time passes!  My last Blog Entry was almost 6 months ago?!?!  Naughty me!

I will have to learn to write short posts and I dunno, edit photos so they are a collage of pictures in one post?  I hate waiting for the upload time :p

Chunks of moreish Refrigerator Cake :)


OK, this chocolate confection goes by many names: No-Cook Cake, Chocolate Tiffin, Chocolate Biscuit Cake (Prince William's favourite apparently), Rocky Road and of course, Chocolate Refrigerator Cake.  Needless to say, many names means many recipes.  I was inspired to make this after seeing a Facebook post from this lady, Jo Wheatley, winner of Great British Bake Off 2.  She has a Facebook page which I have been following.  Her picture of these decadent goodies made me want to make this...

When I make something, I now have an annoying habit of googling the name of the item and reading different variations of the recipe before I make my mind up which to follow.  If it's measured in grams opposed to cups, then I'm more likely to try it - just because I put my bowl on the digital scales and throw things in as I need to. 

I used this Annabel Karmel recipe as my base and used Jo's ideas to create my refrigerator cake.  It is delicious with crunchy and gooey textures and quite rich!

The chocolate mix turned out into my swiss-roll tin ready for chilling

Chocolate Refrigerator Cake

Ingredients:

150g/5oz milk chocolate
150g/5oz dark chocolate
100g/3½oz unsalted butter
150g/5oz golden syrup
small bag of Malteasers (honeycombe balls covered in chocolate 37g bag)
small bag of Minstrels (chocolate buttons encased in a candy shell 42g)
small bag of White Chocolate Buttons (70g)
8 biscuits (rich tea, ginger snaps, digestives, oat biscuits ~ any would work)
50g rice pop cereal
10 marshmallow lumps - quartered (could use mini-marshmallows too)

I made this cake with one bowl, one spoon.  Minimal washing up!  I put my bowl (microwaveable) on my digital scales and added things as I went along - it saved getting separate bowls messy and having lots to wash up :)

Break chocolate into pieces into a microwaveable bowl.
Add the cubed butter and the golden syrup to the bowl.  
Microwave at 100%  (mine is 800watt) for 30 seconds.  Take out and stir the contents.  If there are any remaining lumps of chocolate, microwave again for 15 seconds.  The mixture does not need to be hot, just warm enough to melt the chocolate.  Stirring continuously will help.
When the mix has all turned to liquid, tip in your Malteasers, Buttons, Minstrels, rice cereal, marshmallows and snap the biscuits up as you add them in too.  You can put these in a bowl and bash lightly with the end of a rolling pin if you like - but do not turn it into crumbs - lumpy is fine.
When everything is thoroughly coated in chocolate, tip out onto a shallow tray (I used 20cm x 30cm) lined with cling film (make sure there is excess cling film off the edges to wrap the cake).
Level out as best you can with the back of a spoon. 
Fold the excess cling film over the cake and place in fridge to set (1-2 hours).  Cut into small pieces.  It is quite rich so you do not need a big piece :)

I decorated the top of my cake with drizzles of white and dark chocolate before cutting it up :)
Melt one bar of white chocolate (100g).
Melt remaining dark chocolate left over from making refrigerator cake (50g) - left over milk chocolate is for stress-related emergencies >.<
Drizzle, squiggle, splodge the melted chocolate over the cake as your creative talents allow :)  Replce in fridge for a few mins to harden before chopping into as large/small pieces as you like :)

The beauty of this cake is you can adjust the ingredients as you like.  Add chopped dried fruit (raisins, apricots, dates, stem ginger, sour cherries, cranberries, list is endless...) and nuts (hazlenut, brazil, pistachio) if you prefer.  Or soak the dried fruit in alcohol for 24 hrs prior to making this if you want it to be an adult-only treat!

See the soft, gooey marshmallow, crisp, crunchy Malteaser?


Bagged and ready as a birthday gift to my neighbour :)


Monday, 20 September 2010

Double Celebration - Minh's Full Month Party & Our 5th Wedding Anniversary

The little guest of honor - Minh

Yesterday was a day of Double Celebration in the Diep Household.  We were holding a Full-Month Banquet for out little "Junior" and it coincided with our Fifth Wedding Anniversary!  Yes, sentimental ol' me picked the date in advance of Junior's birth and decided that would be the day to hold his party.  Recently, I have heard these parties called Red & Ginger parties as they are eaten at these events.  Red is an auspicious colour for chinese and vietnamese alike and the egg symbolises fertility.  Ginger is considered good for the new mum as it dispels wind from the body.

Minh is exactly 6 weeks old tomorrow and he was was the guest of honour at his party.  We had a small banquet at a Chinese restaurant for family, relatives and a few close friends.  It was a fun affair as there were several children present -all under the age of seven - so it certainly was lively!  Minh did not mind being passed out for hugs and cuddles amongst the guests and it was great!  Some mums are very protective towards their children and seem happy to hug and hold them all the time.  Don't get me wrong!  I love my hugs and cuddles with my son but as I can get that anytime at home I'm more than willing to share him out for hugs whenever there are friends present!

We certainly had a food feast and I was too busy eating to take photos!  I missed the first three dishes of: Red Eggs & Ginger; Seafood & Tofu Chowder; Braised lobster on a bed of noodles (now, this was a delicious dish and I'm glad I didn't miss any lobster chomping and noodle slurping time by snapping photos!  Heh heh heh!);

Sweet and Sour Sea Bass Fillets;

Steamed chicken with Ginger and Spring Onion;

Yam coated Prawns (yummy!);

Seafood Rice;

Stir-fried Scallop and Asparagus in Noodle Nest;

Braised Chinese Mushrooms with Pak Choi

and Pork fillets in Chinese Style Sauce;

Dessert was a platter of Ice-Cream, Mango Pudding and Toffee coated Banana Fritters.  I also made two sponge cakes.  One was an Orange Sponge filled with white-flesh nectarine and mango cream, topped with a mango rose and strawberry starflower.  The other was a chocolate chiffon with a filling of berry cream and finished with blackberry, strawberry and blueberry.


Mango Rose & Strawberry Starflower


Berry Nice Chiffon

It was a fabulous afternoon which went quickly in the company of good friends and family.  It was worth the past two weeks of stressing over guest lists and seating plans and the nervousness of decorating the cakes the night before the event!

Mya & Minh


Lastly, I got the most beautiful gift from my husband, a pair of diamond encrusted entwined heart earrings, and 18 long-stemmed red roses.  My gift to him?  A beautiful baby boy!


My favourite - Red Roses


Another one of my favourites - Sparkly Things!


Tuesday, 15 June 2010

We're Jammin', We're Jammin'.....

Have been meaning to make jam for a week now....

I  bought a mango a week or so ago and it was a bit firm although the sticker said 'Ripe and Ready', I asked hubbs whether I should cut it up for our fresh fruit dessert.  I did.  It was hard.  Tasted sour.  Not ripe.  Knew I should've trusted my nose and instincts.  Usually I would give the fruit a gentle squeeze in my palm and it should yield a little.  Next a sniff test.  Does it smell aromatic?  Yes?  Well it's ready! 

Well, what was I going to do now with an unripe mango? 
"Stir-fry it." Hubbs says. 
"Yuk!"  I say.  "I'm not into having fruits cooked with meat for stir-fry."  I have eaten kiwi with chicken and stir-fry beef with mango and it's not really my cup of tea.  Don't mind pineapple in a good ol' sweet and sour dish though! :0p
"Turn it into jam then."  Hubbs final suggestion.  Sounded good at the time.

So, it took me a week (or two) to finally get round to making the jam.  I saw 2 punnets of apricots on discount at the supermarket and bought those thinking apricot and mango sound divine!  Thought my sad little mango probably wouldn't be enough so  bought a cheap small one to join it. 

When it came to making the jam yesterday, my unripe mango (sitting sadly naked in the fridge - well, it was peeled and had nothing but clear cling film to shield it's modesty!) was beginning to look a little brown and squishy in places.  I cut the unsightly portions off and proceeded to sample the fruit.  Still did not taste good.  Still sour and now a nasty aftertaste (mango prob past its best).  OK, bin time for the poor mango!

Despite that, I prepared the apricots and the cheap mango.  Oh, note to self, cheap mango means it's the fibrous kind.  The one with more fibres round the central stone than flesh!  (Smells good though!)  Hmm...could do with more fruit?  I raided the fridge to see what else I could find.  I found a ripe peach and a few cherries.  What do I call the jam now?  Will think on this one.


The jam smelt so delicious when it was being made!  Such a rich, intoxicating aroma!  That is the best bit about jam making!  The taste?  It gave my tongue a punch full of fruit flavour!  Other jam successes have been raspberry jam made from raspberries picked from my mum's garden.  Once you've tasted home-made raspberry jam you'll be sorely disappointed in the supermarket offerings!  Blackberry is not such a hit (picked from local hedgerows so free food! Yay!), lacks the full fruity flavour - just offers a sweetness about it and more seeds than raspberries.  I made plum jam too earlier this year from cheap plums from Aldi.  Again, the fruit is sweet but lacks a depth of flavour.  I guess the secret might lie in using fruit which is rich and aromatic in flavour.  Saw some British Strawberries in Asda's yesterday.  They smell and taste delicious.  Would be tempted to jam these too if I hadn't used up my empty jam-jar collection!
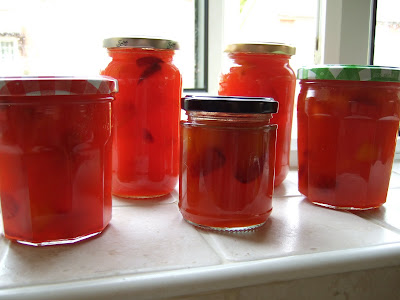


Love the fabulous colour from my "Summer Fruit Jam" - Apricot with Mango, Peach and Cherry.  Sounds like a fairly accurate description? 

This batch of jam was largely made with little measuring.  My rule is usually 500g fruit plus 500g sugar equals jam - I got this from reading somewhere on the internet and followed this basis for raspberry jam I used granulated sugar so had to add 2 teaspoons of powdered pectin (helps the jam to set.).

Recipe
1085g prepared fruit (I used apricots - 14, cut into 1/8, stone removed; 1 peach, cut into 1/16, stone removed; 1 mango, flesh chopped, stone discarded; around 20 cherries, quartered and pitted)
1000g of jam sugar (has added pectin and is suitable for soft fruits such as strawberries, peaches...)
Juice of half a lemon
knob of butter

Method
I placed the chopped fruit and sugar in a large saucepan and added half a cup of water (maybe I shouldn't have added this?) to help the sugar dissolve.  I warmed the mixture gently over a low flame stirring to get the sugar to fully dissolve.  I also added the juice of half a lemon to improve the flavour.  I've found when doing this when making raspberry jam it prevents it from just being sweet, but have a very slight sharpness to it which makes it moreish.


When I was sure the sugar was dissolved (this is very important because if there are undissolved sugar crystals, they will stick and burn on the bottom of the pan when you do the next stage - boiling), I turned up the flame and let the mixture come to a rolling boil (that won't go down when stirred).  Careful!  Use a large pan to make the jam as boiling hot sugar is very hot and can scald!  Boiling jam does spit too!


Boil for 4-5 minutes.  Take pan off heat and put a teaspoon of jam onto a cold saucer (I put a saucer in the freezer when I start jam-making.)  Leave for a minute then push the cooled jam with your finger.  If the jam wrinkles, the jam is ready.  Add a small knob of butter to the jam and stir in.  It helps get rid of the bubbles in the jam so you get a clearer jam in the jar.  Leave the jam to cool slightly (5-10 minutes) before filling the jars - you don't want the glass to shatter!  Pour the jam into warmed sterilised jars.  To sterilise jars, wash in hot soapy water and rinse.  Place upside down in a low oven to dry.  Careful when handling as the jars will be hot out of the oven and also after being filled with hot jam.


I've given a jar to my mum as there's only so much jam 2 people can eat!  Only thing is, this morning, I've discovered the jam is rather soft-set and looking a bit runny in the jars.  Maybe as a result of adding water to the fruit and sugar mix?  I will have to re-boil the jam for 1-2 minutes and do the saucer test again.  Which is strange as I thought it was fine?  Odd thing is I have a ramekin of jam (all jars were filled) and this seems to have set fine?  I will just have to have some jam and toast and sample it!


Mmmm...!  It's surprisingly good!  An intense fruity hit of apricot and peach which is pleasantly sweet and tangy without the sweet sickliness of store-bought apricot jam.  I think the golden orange hue comes from the cherries I added!  :0)  I think this would delicious on warm buttery scones or even a simple swiss roll.  I'm pleased with this batch of jam!

Friday, 30 April 2010

Another Birthday Cake!

I made 2 birthday cakes in the space of a week!  The first was a chocolate chiffon, the second, an orange chiffon with fruit and cream.

My manager at work has reached a milestone birthday and asked if I would make a cake for the occasion.  I had every intention of making one anyway, but he insisted that he would pay me to make the cake!  Well, I couldn't say "N-o-o" could I?  It was so that it could be eaten at work with fellow colleagues. 

This is the creation I came up with....

It's an orange flavoured chiffon with 3 layers.  It has a jam and cream layer, strawberries and cream layer and topped with yet more cream, peaches, kiwi fruit, strawberries and grapes.

Cutting the three layers was a little tricky and it seemed uneven in places but once it was sandwiched up and the sides hidden with cream, white choc shavings and milk chocolate splodges, it was fine!

It was beautifully light and moist and certainly very moreish!  My manager was very pleased with his cake and even had to confiscate it at one point in order for there to be something to take home for his family!

I'm delighted to have come across chiffon recipes and know they make beautifully light, airy, pillow soft cakes that melt in mouth leaving you wanting more!  I'm hoping that I get more requests to make cakes from my work colleagues in the near future!

Wednesday, 10 March 2010

Fresh Fruit Birthday Cake

I also made the cake for the birthday party.  I baked a mandarin chiffon cake topped with vanilla cream and fresh fruit.


The cake was sliced into three layers and had fresh pineapple compote in the bottom layer and mango cream.  It was topped off with more cream and decorated with fresh pineapple; nectarine; kiwi fruit; mango strawberry; blueberry and finally a mandarin glaze! 


Cake decoration and assembly did take quite a while I can tell you!  Doubt if patisserie shops would be as slow as me!  If did cause a sensation at the party and I'm glad to say it was all eaten!