Showing posts with label Orange. Show all posts

Wednesday, 6 March 2013

Tea Loaf Cake


I don't often buy shop-bought cake whether it is a mass-produced branded one or supermarket own brand. I find them a bit dry, a bit sweet for my liking.  Hubbs (Mr Leaf) likes them though.  When they come individually wrapped in slices they are convenient for him to take to work and on special offer - well, I treat him :p  They do a light fruit cake one which has notes of mixed spice and is rather delicious if I may admit!  I tried creating my own...

Tea Loaf Cake

150ml boiling water
1 Earl Grey Tea Bag
250g mixed dried fruit
200g soft butter
75g caster sugar
75g soft light brown sugar
3 large free-range eggs
1 zest of an orange
40g ground almonds
210g self-raising flour
1 level teaspoon baking powder
1.5 level teaspoon mixed spice

Put fruit into a small bowl, tuck in the tea bag and pour on the boiling water.  Leave the fruits to swell and soak up the liquid.
Preheat oven to 180C/350F/Gas 4

Grease and line 2 small loaf tins.  I used a rectangular aluminium foil container and a 2lb loaf tin.

Cream the butter with the sugars until light and fluffy.

Add an egg into the mix along with a spoonful of your measured flour, mix until the egg has been incorporated.  Repeat with the remaining eggs.

Tip the fruits along with any liquid into the cake mix, give the tea bag a good squeeze. I emptied the bag of it's leaves into the cake mix as I thought it might improve flavour.  Add the grated orange zest and the ground almonds and fold in.

Sift the flour, baking powder and spice into the bowl, fold to combine.

Spoon into the greased tins and bake.  My loaf tin took 45-55 minutes and the smaller aluminium container took 35-45 minutes.  If the cakes brown too much, lower the heat slightly.  When you are checking the cake, give the tin a shake.  If the mixture wobbles, cake is not ready and may need another 10 minutes before you check.  Use a skewer to test the cake in the centre any gooey wet mix indicates cake is not ready and may need a further 5-10 minutes.
Sprinkle a little caster sugar on top of the cake when done, or dust with icing sugar.  Leave cake in tin for 10 minutes before cooling on rack.


*** Verdict
Not the same as the mass produced one which is lighter in colour (I suspect the tea leaves in my cake give it a richer colour) and I think if I stuck with one flavour instead of Earl Grey Tea and orange with the mixed spice it might resemble the bought-cake.  Nevertheless, my mummy friends all enjoyed the cake and at least I am happy eating something I know I made (even if hubby eats the plastic wrapped version!) :)


Thursday, 15 November 2012

French Madeleines

Perfect little cakes for afternoon tea, with friends or for little fingers!

It seems that I have introduced a new favourite cake with my son - French Madeleines.  They are little shell-shaped cakes that are buttery and very delicious!  They usually have a characteristic 'bump' too - like a fat belly!  I struggle to achieve the bump on my cakes but they taste nice all the same!  Oh, and to my son, these shell-shaped cakes are "little boats" :)

The recipe I have used is adapted from BBC website "Madeleines with lemon curd" - but there are many around on the 'net.  Use whichever one you like the sound of :)


The closest I can get to achieving a "bump"

Orange Scented Madeleines


3 free range eggs
100g caster sugar
200g plain flour
10g baking powder
1 orange (grated zest)
20g honey (I used a set honey but otherwise a runny one will be fine)
60ml milk
200g butter (melted, cooled)

Whisk the eggs and sugar in a large bowl until pale and thickened.

Add the milk and honey to the melted butter and mix.

Pour the melted butter mix into the egg batter but down side of bowl.  Be delicate with the whipped egg & air mixture! Add the grated orange zest.

Sift in half the flour and baking powder and fold gently.  Sift in remaining flour and baking powder and fold.

Leave the batter to rest in the fridge for an hour or overnight.  (Not sure why - but different sites say it helps achieve the "bump" on the madeleines.)

If you are like me, you cannot wait to bake your little nuggets of buttery delights. ;)
So turn on oven to Gas 5/190C/375F.  While oven is heating up, butter and flour your madeleine tin.  I have a silicone ones in different sizes.  I also use a mini-teddy bear tin.  The flour is very important as it makes it easier for the cakes to fall out from the tin after baking.  Trust me on that one!  I made the mistake of only greasing the teddy bears one morning and YUP! Half the teddies stuck to the tin DESPITE it being "non-stick".

For my larger madeleine shells, I put about a dessertspoon of mix in each shell.  You are aiming for 80% full and not too worry about making it even as the baking levels it out.  For mini-madeleines or mini-teddies, then I go for a teaspoon of mix.

Bake for 7 minutes, then turn oven off for 5 minutes (apparently, this creates the "signature bumps" - mine do get a small bump not a great big one).  Turn oven back on but this time at Gas 3/160C/325F.  Bake for a further 7 minutes.  The shells should just be tinged brown on the outsides.  For my mini-sized moulds I bake 5 minutes, rest 5 minutes then continue with a final 5 minutes.  Cool the tin for a few minutes before turning out onto a cooling rack.  The silicone madeleines should fall out easily but a prod from the underneath helps any disobedient cakes.  For my teddy tin (as it's metal) a sharp tap on the cooling rack sends any teddies tumbling out of their beds!  (Provided I greased and floured the tin!)

Baking these little cakes in a metal tin gives a more evenly brown colour than in silicone


You can just make out the little bear's face 
A fat belly appearing on the bear!
I usually bake a batch of madeleines so my son can munch on them.  The remaining mixture is placed in a bowl, covered with cling film and is baked the following morning.  The tin should be washed and dried before re-greasing and flouring when baking another batch.

* Greasing and flouring.  I rub butter using fingers or a piece of buttery paper in the nooks and crannies of the tin.  I sprinkle flour in each indentation and shake the tin in every direction to coast the buttery surface with flour.  Finally tap any loose flour away.
With a silicone mould, I do the same buttering process but to distribute the flour I fold the silicone mould in half and shake/clap the mould to get the flour coated inside.  Shake any excess flour off before filling.

I have made these with lemon zest before and with green tea powder (I added about 1 teaspoon of ground green tea with the flour).  I haven't tried chocolate as yet but I would substitute 25g flour for 25g cocoa powder.


Tuesday, 12 June 2012

Chiffon Cake Photos II


These are taken from the digital camera - hopefully better picture quality than the camera phone!


Here is a Gluten-Free Lemon Chiffon. I have a gluten intolerant friend and I made this cake as a treat for her.  She was having a stressful day decorating a 2-tier surprise birthday cake for her mum and I wanted to bring a smile to her.


This is the Mango Chiffon I created for my birthday.  It still stands fairly tall baked in a round springform tin despite not having a central tube to climb up on during baking.  I think this was a 9" cake.  It was also another gluten-free chiffon.


Ideally, I should've used more cream to top cake with but I wanted it to be not as sinful as I had a friend who was on a diet - too much cream and she may not even try it!


My gluten intolerant friend enjoyed the lemon chiffon so much she asked me to make another but fill it with cream, raspberries and strawberries for her partner's birthday.  I would like to have glazed the fruits but sometimes you have to go with what the customer wants!


Chiffon Cake Photos

These are a selection of photos taken from my camera phone (hence not great pictures and lighting).  Most have these have been celebration cakes and dressed with fruit and cream.


I made this as a surprise for a friend's 30th Birthday (July 2011)


This was for my niece's 3rd Birthday in March 2012. A Vanilla Chiffon, split in 3 layers.


Just to show you how tall my chiffon cakes usually rise - 4 egg mix in a 9" springform pan.


Mango Chiffon made for my birthday (April 2012).  Only a skimpy amount of cream as a friend was on a diet!


A Banana Chiffon I made for my mum's work - smells so good my son wants some!

Lovely, tall and airy.  I think I didn't invert this one quick enough as the top has dipped slightly and you can see the bubbles are squashed.  (Cake is inverted to serve so top of cake is actually on the bottom.)

Chiffon cakes can be successfully made using gluten-free flour! A lemon chiffon filled with fresh raspberries and cream as per my friend's request.


Sunday, 6 March 2011

Birthday Cake - Mango & Strawberry Flower

I've just finished making the birthday cake for my niece's 2nd birthday.  The celebration will be tomorrow.  Technically, in around 12hrs time, but I always call it tomorrow if it's the early hours and I've not had my sleep yet.

I'll try and remember to take pictures of the yummy Vietnamese food my SIL & her auntie will prepare, but I often forget!

Here's the finished cake!


Don't even ask me where I'm going to put the candles!!!!

As you can see, I'm quite glad I didn't put the candles in yet as the cake only j-u-s-t managed to fit into the fridge!!!!


I took plenty of photos whilst cake making - including the errors I made and I'll do a post soon of how I made this cake.

Happy Virtual Feasting!

Saturday, 2 October 2010

Orange Chocolate Chip Bread 香橙巧克力麵包

I've not yet baked this, but those who've read the previous posts on bread will understand 70% of this bread dough is started 17 hours ahead and left to prove in fridge.  (Edit: bread baked 03 Oct ~ photos and comments added below.)


Orange Chocolate Chip Bread 香橙巧克力麵包

Pre-ferment Dough
bread flour          70%          462g
water                  40%          264g
fresh yeast           2%            13g
sea salt                1%            7g
skim milk powder 2%           13g

Dissolve the yeast in water.  Add bread flour, sea salt, skim milk powder and knead until soft.  Cover the dough in cling wrap.  Refrigerate to let it prove for 17 hours.

Dough
bread flour              30%          198g
skim milk powder     3%            20g
sea salt                     1%              7g
sugar                       10%           66g
water                       2%            13g  (I didn't bother with the water as it's only a small amount)
egg                           6%           40g
orange marmalade   24%        158g  (Mine was an Orange & Tangerine Marmalade)
fresh yeast               1%             7g
unsalted butter         8%           53g

Filling 
100g chocolate chips  (I used dark chocolate chips)
2 pc grated orange zest or glace orange peel  (I had a tub of whole candied clementines I'd bought from France a few years back.  I chopped one clementine for the bread (50g).  Next time I would double this as it disappeared in the loaf.)


  • Cut the pre-ferment dough into small pieces.
  • Knead all ingredients together (except the butter, chocolate chips and the orange zest).  Add pre-ferment dough piece by piece.  Knead after each addition until soft and smooth.  Add butter, chocolate chips and the orange zest. Knead until stretchable consistency
  • Put the dough into a big bowl.  Cover with cling wrap and let it prove for about 25-30 minutes.  (I left mine in a mound on a board and covered with oiled cling film.)
Looking just swell.

  • Divide the dough into thirty-six small equal portions.  Flatten to drive out the air. Roll them into balls.  Set aside to rest for about 20 minutes.  (The weight of my dough came to approx 1550g.  I rolled 15x50g balls to fit in one loaf tin and hand squared 8x100g pieces of dough to fit in the other tin.)


  • Flatten and roll them round again.  Place nine dough balls into a square tin.  Cover with cling wrap.  (The author used 4 small square tins that she called  mousse tins.  I used the two 1lb loaf tins I have.)

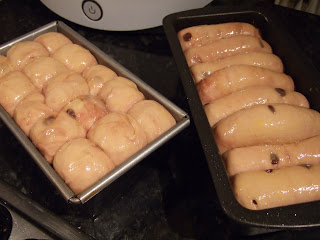
  • Let it prove again for about 40-45 minutes or until the dough has risen to 80% of the depth of the loaf tin.  (I added egg wash on the top of my breads before baking for a shiny finish.)  Bake in a pre-heated oven at 170-180 deg C for about 30-35 minutes.
Puffed and proven, ready for the oven.  The rolls on right look like fat sausages!

    Notes
    Baking chocolate can stand high heat.  It doesn't melt in the baking process.


    This is the recipe from Kin's book, Natural Breads Made Easy.  (天然麵包香 ~ 獨角仙@藍色大門.)  I am in the process of making this and will finish the post with my results tomorrow including any findings and photos.  :0)

    Natural Breads Made Easy.  (天然麵包香 ~ 獨角仙@藍色大門.)
    Bread Bake Off Update:

    I made a couple of boo-boos (a silly error - or in my case, THREE boo-boos,) when making this bread.  Firstly, when I had incorporated the pre-ferment dough to the dough mix, I thought the dough was too wet and sticky so I added a tablespoon of flour.  Then another and another.  I still had a sticky chewing gum type mass in the bowl - not elasticy and stretchy at all.  Then I realised I'd forgotten to add the butter, choc chips and candied orange!  The addition of butter usually makes the dough less sticky and easier to work with.  The fear of adding too much flour is that the ratio of flour to water is altered and can result in a tough, drier bread.

    My second boo-boo was not greasing the loaf tins properly.  One has a non-stick finish so no probs there.  The other tin was probably not greased carefully enough and the sides of the bread stuck to the pan!

    Now, I'm not entirely sure what I did wrong but the bottom of the loaves are indented.  It looks like the dough did not touch the bottom of the tin.  I don't know whether that was me not putting the dough in very well into the tins or whether I took the bread out to early to see if it was ready.  I baked as instructed for 30 minutes and tipped the longer loaf out to tap the bottom.  I was surprised to see the bottom of the dough did not touch the bottom of the pan and so was soft and spongy.  A hollow sound when tapped indicates the bread is cooked.  The breads were already looking rather browned on top so I lowered the shelf and turned down the heat a little.  I baked for a further 15 minutes.  This time I checked the shorter loaf tin.  This bread was stuck to the sides.  (Did I forget to grease this?)  Again it had a puckered base.  Into bake again for a further 15 minutes.  They looked finally ready although the bases still hadn't recovered fully.  Have not seen this before and not sure what had caused it.  Still sliced and tasted lovely.  Love the dark choc chips in the loaf but I'm not sure where the candied clementine went?  I would add another candied clementine next time and go easy on adding more flour.  The bread has a good chew to it may be a result of the flour I was adding.   Maybe you'll do a better job than I did!

    My blog friend Everybody Eats Well In Flanders made this in tandem this weekend as I posted the ingredients and recipe before I completed the loaves so she could bake it too.  Her hand-held mixer died on her in the process but she still made an excellent loaf.  Her version she called Orange Marmalade Loaf as she omitted the chocolate chips.


    Bread is slightly over fired but it gave it a nice crunchy crusty top.


    Not sure what I did wrong but the base of the bread is puckered.


    Despite my errors, the bread does have minute bubbles running through it.

    Monday, 20 September 2010

    Double Celebration - Minh's Full Month Party & Our 5th Wedding Anniversary

    The little guest of honor - Minh

    Yesterday was a day of Double Celebration in the Diep Household.  We were holding a Full-Month Banquet for out little "Junior" and it coincided with our Fifth Wedding Anniversary!  Yes, sentimental ol' me picked the date in advance of Junior's birth and decided that would be the day to hold his party.  Recently, I have heard these parties called Red & Ginger parties as they are eaten at these events.  Red is an auspicious colour for chinese and vietnamese alike and the egg symbolises fertility.  Ginger is considered good for the new mum as it dispels wind from the body.

    Minh is exactly 6 weeks old tomorrow and he was was the guest of honour at his party.  We had a small banquet at a Chinese restaurant for family, relatives and a few close friends.  It was a fun affair as there were several children present -all under the age of seven - so it certainly was lively!  Minh did not mind being passed out for hugs and cuddles amongst the guests and it was great!  Some mums are very protective towards their children and seem happy to hug and hold them all the time.  Don't get me wrong!  I love my hugs and cuddles with my son but as I can get that anytime at home I'm more than willing to share him out for hugs whenever there are friends present!

    We certainly had a food feast and I was too busy eating to take photos!  I missed the first three dishes of: Red Eggs & Ginger; Seafood & Tofu Chowder; Braised lobster on a bed of noodles (now, this was a delicious dish and I'm glad I didn't miss any lobster chomping and noodle slurping time by snapping photos!  Heh heh heh!);

    Sweet and Sour Sea Bass Fillets;

    Steamed chicken with Ginger and Spring Onion;

    Yam coated Prawns (yummy!);

    Seafood Rice;

    Stir-fried Scallop and Asparagus in Noodle Nest;

    Braised Chinese Mushrooms with Pak Choi

    and Pork fillets in Chinese Style Sauce;

    Dessert was a platter of Ice-Cream, Mango Pudding and Toffee coated Banana Fritters.  I also made two sponge cakes.  One was an Orange Sponge filled with white-flesh nectarine and mango cream, topped with a mango rose and strawberry starflower.  The other was a chocolate chiffon with a filling of berry cream and finished with blackberry, strawberry and blueberry.


    Mango Rose & Strawberry Starflower


    Berry Nice Chiffon

    It was a fabulous afternoon which went quickly in the company of good friends and family.  It was worth the past two weeks of stressing over guest lists and seating plans and the nervousness of decorating the cakes the night before the event!

    Mya & Minh


    Lastly, I got the most beautiful gift from my husband, a pair of diamond encrusted entwined heart earrings, and 18 long-stemmed red roses.  My gift to him?  A beautiful baby boy!


    My favourite - Red Roses


    Another one of my favourites - Sparkly Things!


    Friday, 30 April 2010

    Another Birthday Cake!

    I made 2 birthday cakes in the space of a week!  The first was a chocolate chiffon, the second, an orange chiffon with fruit and cream.

    My manager at work has reached a milestone birthday and asked if I would make a cake for the occasion.  I had every intention of making one anyway, but he insisted that he would pay me to make the cake!  Well, I couldn't say "N-o-o" could I?  It was so that it could be eaten at work with fellow colleagues. 

    This is the creation I came up with....

    It's an orange flavoured chiffon with 3 layers.  It has a jam and cream layer, strawberries and cream layer and topped with yet more cream, peaches, kiwi fruit, strawberries and grapes.

    Cutting the three layers was a little tricky and it seemed uneven in places but once it was sandwiched up and the sides hidden with cream, white choc shavings and milk chocolate splodges, it was fine!

    It was beautifully light and moist and certainly very moreish!  My manager was very pleased with his cake and even had to confiscate it at one point in order for there to be something to take home for his family!

    I'm delighted to have come across chiffon recipes and know they make beautifully light, airy, pillow soft cakes that melt in mouth leaving you wanting more!  I'm hoping that I get more requests to make cakes from my work colleagues in the near future!

    Wednesday, 10 March 2010

    Fresh Fruit Birthday Cake

    I also made the cake for the birthday party.  I baked a mandarin chiffon cake topped with vanilla cream and fresh fruit.


    The cake was sliced into three layers and had fresh pineapple compote in the bottom layer and mango cream.  It was topped off with more cream and decorated with fresh pineapple; nectarine; kiwi fruit; mango strawberry; blueberry and finally a mandarin glaze! 


    Cake decoration and assembly did take quite a while I can tell you!  Doubt if patisserie shops would be as slow as me!  If did cause a sensation at the party and I'm glad to say it was all eaten!