Showing posts with label Bread. Show all posts

Saturday, 30 March 2013

Hot Cross Buns (Delia Smith's)


Happy Easter!
Easter and you think of sun and blue skies; April Showers (rain); young lambs frolicking in the fields; fluffy chicks; new beginnings; lots of chocolate and my favourite of all - Hot Cross Buns.
My mum enjoys these too and I remember making these when I was younger - they often turned like rocks the next day though.  Large supermarkets have in-store bakeries that churn out stacks and stacks of these buns so it's cheap and easy to buy them these days.

I saw something intriguing on another blogger's post, it was Cook Like A Star where a celebrity chef is chosen and participants cook any dish by the said chef.  This occasion it's the turn of Delia Smith in the spotlight.  I have watched Delia Smith on TV cookery programmes from when I was a child and some of my favourite cake recipes are in fact from one of her books.  So what better excuse to look up recipes to cook and join in the blogging and cooking fun!
(Thank you Anncoo for your delicious post on Chocolate Drop Mini Muffins with Red Noses - as that is where I saw the Cook Like A Star blog hop event!)

Hot Cross Buns (recipe adapted from Deliaonline - Hot Cross Buns)


Ingredients
450g strong bread flour
50g caster sugar
5g salt
7g easy-bake yeast
125g dried mixed fruit (raisins, sultana, currant & mixed peel)
1 tsp ground cinnamon
50g butter
1 egg
50ml milk
150ml water
Crosses
3 tsp plain flour
3 tsp water
Glaze
1 tsp honey
2 tsp warm water

Sift flour, salt and cinnamon into a mixing bowl and add the sugar, yeast and dried mixed fruit. Stir to mix everything together and make a well in the centre.

Melt the butter in a jug, add the milk, crack the egg in and mix together.  Pour this into the dry ingredients, add most of the water (saving a couple of tablespoons back in case dough gets too wet), mix with a spatula until a dough begins to form, then put your hand in to squeeze and bring everything together.

Transfer dough to a clean surface and knead until it feels smooth and elastic - about 6 minutes.  Pop it back into the bowl, cover the bowl with a lightly oiled sheet of cling wrap and leave in a warm place to double in size (it will take about an hour).

Turn it out and knead lightly until it has returned to original size.  Divide dough into 12 equal pieces and roll them into balls.  Place them on a lined baking sheet leaving room for them to rise.  Cover with the oiled cling wrap and leave to rise again (about 25 minutes).

Preheat the oven to gas 7 / 220 C / 425 F.

Mix the plain flour with the water in a small bowl to a smooth paste.  Use this to gently pipe crosses onto the risen buns.

Bake the buns for about 15 minutes.

Mix the honey with the warm water and brush the buns when they are hot from the oven to make them shiny and sticky.

Transfer to a rack to cool.


This is my submission to the blog hop event Cook Like A Star (March 2013) organised by: Zoe (Bake For Happy Kids), Baby Sumo (Eat Your Heart Out) and Mich (Piece of Cake)


Sunday, 12 August 2012

Tiger/Giraffe Bread


I love Tiger Bread!  It's a loaf with a special coating on which you can get in the fresh bakery section of the major supermarkets here in UK.  A distinctive aroma which reminds me of toasted Marmite which means it's yummy in my opinion!  It has a lovely crackly crust which is usually on bloomer shaped bread.  I've seen a supermarket call its Tiger Rolls, Tiger Paws!  The baguettes are Tiger Tails of course! :D

One supermarket chain changed the name to Giraffe bread after a little girl wrote in saying it resembled giraffe more than tiger.  She's not wrong!


Seeing this recipe posted on Jo's Blue Aga, I had to give it a try.  I follow Jo on her Facebook page too :)  As well as entering her monthly baking competitions!


With a cupboard stocked with strong flour (for bread baking) and a fresh packet of dried yeast I thought I was good to go.  I assumed I had rice flour in but my luck was out.  Rice flour is the magic topping ingredient here too!  I had everything but that!  Plain flour; self-raising; gluten-free flour; tapioca flour; potato starch, glutinous rice flour and cornflour!  None of which I have seen suggested on the internet as a substitute for rice flour!

Determined to try Tiger Bread, I thought I'd grind my own.  First I used the food processor attachment on my electric hand blender.  Next, good ol' mortar and pestle.  Finally, the coffee grinder which has never ground a single coffee bean in it's life of sitting on the kitchen shelf looking pretty!  After sieving the flour through it resembled semolina you roll pizza dough out with.  I still gave it a try but only made a quarter of the  topping.  I used this to spread on one of my loaves which was proving nicely after my battle trying grind rice grains!  The other loaf I left plain in case the home-ground rice flour topping was a complete disaster!


The resulting bread was definitely not like the Tiger Bread you buy in shops.  It lacked the toasty aroma and I struggle to get the nice crunchy crust on my home baked loaves.  It also didn't crackle very much.  Despite all that, it was a very nice tasting loaf, soft and springy.  It's amazing what 'still within date' dried yeast can do compared with 'hiding in the cupboard too long' yeast can do!


Tuesday, 7 August 2012

A Passion for Baking - Basic White Bread Competition


Competition Number 3 by Jo Wheatley of Jo's Blue Aga - and it's the Basic White Loaf, again from her book, A Passion for Baking.

This came in great timing as I fancied making bread and had just stocked up on strong bread flour (it has higher protein content which helps the structure of the loaf), shame I didn't have sense to buy some instant yeast as what I had in the cupboard had been knocking around for a bit :p  They say it deteriorates quickly and loses its ability to rise well.  *Shrugs*  Ah well :p

It was a simple recipe to follow and we had option of using stand-mixer or by hand.  Well, I pulled out my trusty Kenwood and made it work :p  I do have an almost 2 year old to entertain too you know! ;)

I was pleased with the small but evenly sized bubbles in my loaf - felt quite moist and springy too!

Maybe my shaping of the loaf before it goes in the tin needs perfecting as the bread rose unevenly during baking and resembled an odd shaped mushroom :p  I had forgotten how delicious the aroma of bread baking in the oven was :D  It was hard resisting temptation to slice into the loaf whilst warm - but I think that just tears the bread.

Oh, I can't cut fresh bread - I always managed to get wonky slices that resemble door wedges! :p  There is an upside to that that though, my correcting slice was too thin to be a regular slice of bread and so I sampled that with some butter and some home-made raspberry jam!  Ahem!  I mean I had to have a slice with butter and jam for the photo shoot of course!  *Wink Wink!*


MmmMMm!  Fresh bread!  YUM YUM!


* * *
I baked the loaf last Thursday but to spare you the suspense of waiting to find out who won, I have waited until today (Tuesday) to publish this post.  Winner was announced this morning - not my entry but I enjoyed taking part and seeing other people's entries :)

Winning loaf is here:

https://www.facebook.com/photo.php?fbid=429968647046652&set=a.210358729007646.49812.194356760607843&type=1&theater


Sunday, 26 December 2010

Boxing Day Bun Bakery


Was woken early by the "Boss" (also known as Baby Minh) so I thought I'd might as well get on with baking the buns I'd prepared the night before. 

 Tuna mayo buns are a favourite of mine from hols to Hong Kong so I recreated them at home.

 Sausage buns were a childhood favourite so I'm reliving some memories.  Although they were mainly just rolled around the sausage - a bit like a mummified sausage.


 Had to make some Char Siu Chan Buns too!


Tray of buns ready to take to my parents house later.


** I did this post in a hurry & have now included links to the recipes where available.

Sunday, 31 October 2010

Bun Bakery - Char Siu (BBQ Pork) Bun 叉燒餐包, Pineapple Bun 菠蘿包 & Custard Bun 奶黃包


PlumLeaf Bakery with four trays of buns ready for the baking!
Had a crazy bout of bun bakery this weekend!  I doubled the quantity in EEWIF's Sweet Bread Dough recipe as I intended to give some buns to my brother and his family who are visiting my mum whilst my niece is on half-term holiday.

Char Siu Piggy hiding next to the Pineapple buns!


Piggies fighting in oven?!  Out of place ears and snouts!
Custard Filled Hedgehog

Tray of Custard Buns


We always loved Char Siu Buns as kids and sometimes Dad would buy buns from Chinese Bakery in Chinatown as treats.  I also tried some different toppings and fillings.  My bro' likes Bor Lor Bao ~ Pineapple Bun 菠蘿包 so I thought I'd try recreate that one.  There are several different recipes for pineapple topping floating around the internet but I like the sound of this one from Bao/Bread and as it was enough for 6 buns it gave me opportunity to whip up a batch of custard filling as my third bun flavour.

Char Siu buns had more room on tray at front - ugly ones at back of queue!
I must remember to space out my buns better as I had Char Siu Buns that had merged into one another (like my red bean ones did a few weeks back).  Instead of being beautiful burnished domes of porky bun goodness, it resembled burnt honeycomb.  Not a good look.  Had fun making a couple of Char Siu Pigs though!  Those two had slightly more filling than the rest (only 5 g extra) so I thought I'd make fat pigs out of them!  They did swell out - looked almost ready to burst!

Custard Buns

Have still yet to make my Hong Kong favourite - Tuna Bun 吞拿魚包.  Also got to dream up of some more tasty fillings! Yum Yum!  Am loving this recipe so much!  I have to thank Everybody Eats Well In Flanders again for sharing an excellent recipe!

Friday, 15 October 2010

White Farmhouse Loaf - traditional method

I was pleased with the bread - light, airy and a great chewy texture.


I was baking again.  Yup, bread.  There's something about that white, soft, texture that is comforting.  Whenever I have an attack of the munchies - there's always good ol' bread to turn to.  I have 1001 things I could be doing with what time I manage to get between my baby son's feeds, but I choose to blog-hop.  It's whilst doing that when I stumble upon a beautifully risen, golden crusted loaf in The British Larder.  That's done it!  I have to go bake me one!  Well, you gotta eat!

It's quite a simple recipe and with the aid of trusty ol' Kenwood Mixer, nothing is too difficult!  The blog recipe makes 2 x 600g loaves and mixes and kneads by hand.  My version uses the mixer for making and kneading the dough - with a crying baby to attend to I find using the mixer a great help.  Hubbs isn't a bread fiend like me, so one loaf will suffice.

I've tweaked it a little, but this is what I used:

375 g strong bread flour (white)
7 g fresh yeast
7 g salt (bit too salty for my liking, I'd reduce to 5 g next time)
260 g warm water (it is cold in UK now, so I thought warm water would help things along)
15 g butter (I remember reading butter improves taste and helps the bread remain moist)

Rub the yeast into the flour with your fingertips until the yeast is incorporated into the flour.
Stir in the salt.
Add the warm water and with the dough hook attachment, turn mixer on to mix until a dough is formed.
Add the butter and continue to mix until a smooth and elastic dough is achieved.  There should be no sticky dough left at the bottom of the bowl.
I left the mixer on speed 2 for 10 minutes and checked the dough.  It was sticky and like chewing gum, not a great stretch.
I turned the mixer back on and kneaded for 10 more minutes.   This time the dough was more stretchy and resembled bubble gum.  I was able to pull it fairly thinly before it broke.
I turned the dough onto a board and covered with greased cling film for 1 hour to double in size.
I pressed and patted the dough into a rectangle and folded the sides in.  I guess this is to tighten the surface of the dough so it will rise upwards rather than outwards.  I kept tucking the sides of the sausage shaped dough in underneath the dough so I had a smooth long sausage shape to put into my greased loaf tin.
The dough was left for 2 hours under a clean dry tea-towel to prove.
I baked the loaf at 220C, gas 7 for 30 minutes.  I turned the dough out and the base sounded hollow when tapped so I left it to cool on a rack.

I did slash the loaf after rising along the length but I guess I was too scared to do it deeply enough!  Oh, and a farmhouse loaf is usually floured before baking - forgot that step too!


The bread is wonderfully moist and soft.  It has a lovely chew about the bread but is a tad too salty for my palate.  That said, when buttered, you don't taste the saltiness but I would still reduce the salt content next time.  All in all, I was impressed with the results especially as it wasn't complicated or needed any starter dough, sponge dough or pre-ferment dough.  The slices of bread are still moist and soft now after 8 hours!  I'm keen to find out what it's like in the morning!


Thursday, 14 October 2010

More Buns...

I'm hiding the bun's ugliness round the other side of the bun!


I was so pleased with the BBQ Pork Buns (Baked Char Siu Buns) that I thought I'd expand a little and try out some more fillings.  Hubbs likes Red Bean Filling and when I first tried making buns from my Alex Goh book, he pointed at the Matcha Red Bean Buns but I had decided to make the Butter Coconut Buns - I said I'd make them next time and he's still waiting as that next time hasn't come round for him yet!  As EEWIF has such a great sweet bun dough recipe I thought I'd make a batch and fill with red bean.  I have a can of red bean paste and my mum gave me a can of whole red beans (from Tesco).  I thought I'd combine the two so I would get a paste with more texture - a bit like the Japanese filling but less dry.  It kinda worked - but some of the canned whole beans are a little too hard.  Perhaps they could do with being cooked a little longer?  Or maybe mashed a little?

I split my dough into 16 pieces this time instead of 10 and filled half with the red bean paste.  I then wrapped and transported it to my mum's to finish off.  I figured that they'd still prove in their 35 minute journey to mum's.  As it turned out, they didn't travel that well as they stuck to one another and didn't look like the flower shapes I wanted them to be.  I still baked them and they were the most ugliest buns ever!  Not round as I'd cut the edges to replicate flower petals and besides, they were pretty close neighbours with one another and some were beginning to merge as one!  So I'm blushing with the memory of their misshapeness!  The inside of the bun looked okay though!

Wanted a photo with steam coming out of the filling.  I guess I'd have to grab a steaming hot bun and be standing in a walk-in freezer to get that shot!


With the other half of the bun dough I decided to make ham and cheese buns as in EEWIF blog as I thought they looked so good.  These I thought were very tasty (although I didn't do the cheese & mayo topping) and I really love that bread dough recipe!  It's really, really good!  I think it's as good as from a Chinese Bakery!


This was my breakfast a few days ago, see the airy bubbles in the ham 'n' cheese bun?  The other is a toppled over nutella & almond spiral - I ran out of ham 'n' cheese.


I still want to make Tuna Bun as these are my fave buns from Hong Kong Bakery!  So deliciously soft and savoury!  My older bro' likes Bolo Bao (Pineapple Buns) so I guess I'll make those too in a couple of weeks when he visits my mum.  There is a half-term holiday at the end of October and he usually spends a few days with mum so she can get to see her granddaughter Sophie.

Saturday, 9 October 2010

Baked Char Siu Buns, 叉燒餐包

Hot, fresh out of the oven.


I had intended to bake these buns at the beginning of the week after being inspired from Everybody Eats Well in Flanders blog on sweet bread dough.  However, I delayed until yesterday evening/this morning.

The recipe I used is an Alex Goh recipe from Everybody Eats Well in Flanders.  It's unusual as 1/5 of the flour content in the dough is made with boiling water, then refrigerated for 12 hours.  This gelatinised dough allows the starch grains to swell and absorb more water resulting in a softer, moist bread.  SeaDragon talks about this in his Corner Cafe blog too.

Sweet bread dough made with first prove - ready for dividing, shaping & filling.
The recipe for the sweet bun dough is here and here is a slightly different version.  I used the former.

With char siu given to me from my mother, I set about in making a filling for my buns.  I didn't think to weigh the char siu first but I had 1 & 1/2 strips of meat.  I chopped a red onion and fried in oil until soft before adding the sliced char siu.  I continued to fry gently and when the edges of the meat began to brown I added about 75ml of water and 1 dessertspoon of Lee Kum Kee's Char Siu Sauce.  I thickened with cornflour paste and set aside to cool.  The prepared filling was 475g.

Trying to show how I 'walk' the dough with my fingers bringing it to the thumb to be pinched together.


My dough came to 950g so I divided this into 10 x 95g balls.  I flattened each ball with my fingers to a 3 inch circle (approx) and placed 45-50g filling before pinching the edges together to pleat and seal the dough.  The filled dough ball was placed seam side down on waxed paper.  As I didn't start making the sweet bun dough until quite late in the evening, I decided I would place the shaped and filled buns in the fridge overnight to prove.  

Night-night buns, time to tuck you into bed (fridge to prove).


The buns were all filled and placed in the fridge by 1am.  Sleep time for me now!

The first batch has been 'painted' with it's tan & bake (egg wash) & ready for baking!


I was unfortunate enough to have my baby son wake me several times in the night (2:30am, 4:00am, 6:00am) and after getting up for the third time, I decided it was time to bake the buns!  By this stage, they'd been left to prove for five hours and despite being put into a cold environment, the yeasted dough had done its magic and the buns had swollen up nicely.  I brushed with egg wash and baked at gas 5 for 25 minutes on the middle shelf.  The middle of my oven isn't as hot as the top and I cooked longer than suggested as I fear uncooked dough.

The buns puffed further during baking and I was rewarded with the sight of shiny, golden brown buns!

Shiny and golden ready to be eaten!


I'm not sure how they taste yet as I'm waiting for hubbs to see them first before they get demolished eaten!  For now, I think I may go back to bed!

Saturday, 2 October 2010

Orange Chocolate Chip Bread 香橙巧克力麵包

I've not yet baked this, but those who've read the previous posts on bread will understand 70% of this bread dough is started 17 hours ahead and left to prove in fridge.  (Edit: bread baked 03 Oct ~ photos and comments added below.)


Orange Chocolate Chip Bread 香橙巧克力麵包

Pre-ferment Dough
bread flour          70%          462g
water                  40%          264g
fresh yeast           2%            13g
sea salt                1%            7g
skim milk powder 2%           13g

Dissolve the yeast in water.  Add bread flour, sea salt, skim milk powder and knead until soft.  Cover the dough in cling wrap.  Refrigerate to let it prove for 17 hours.

Dough
bread flour              30%          198g
skim milk powder     3%            20g
sea salt                     1%              7g
sugar                       10%           66g
water                       2%            13g  (I didn't bother with the water as it's only a small amount)
egg                           6%           40g
orange marmalade   24%        158g  (Mine was an Orange & Tangerine Marmalade)
fresh yeast               1%             7g
unsalted butter         8%           53g

Filling 
100g chocolate chips  (I used dark chocolate chips)
2 pc grated orange zest or glace orange peel  (I had a tub of whole candied clementines I'd bought from France a few years back.  I chopped one clementine for the bread (50g).  Next time I would double this as it disappeared in the loaf.)


  • Cut the pre-ferment dough into small pieces.
  • Knead all ingredients together (except the butter, chocolate chips and the orange zest).  Add pre-ferment dough piece by piece.  Knead after each addition until soft and smooth.  Add butter, chocolate chips and the orange zest. Knead until stretchable consistency
  • Put the dough into a big bowl.  Cover with cling wrap and let it prove for about 25-30 minutes.  (I left mine in a mound on a board and covered with oiled cling film.)
Looking just swell.

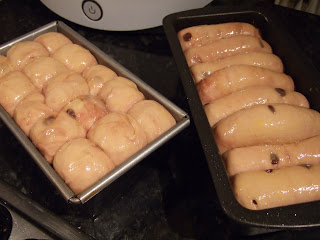
  • Divide the dough into thirty-six small equal portions.  Flatten to drive out the air. Roll them into balls.  Set aside to rest for about 20 minutes.  (The weight of my dough came to approx 1550g.  I rolled 15x50g balls to fit in one loaf tin and hand squared 8x100g pieces of dough to fit in the other tin.)


  • Flatten and roll them round again.  Place nine dough balls into a square tin.  Cover with cling wrap.  (The author used 4 small square tins that she called  mousse tins.  I used the two 1lb loaf tins I have.)

  • Let it prove again for about 40-45 minutes or until the dough has risen to 80% of the depth of the loaf tin.  (I added egg wash on the top of my breads before baking for a shiny finish.)  Bake in a pre-heated oven at 170-180 deg C for about 30-35 minutes.
Puffed and proven, ready for the oven.  The rolls on right look like fat sausages!

    Notes
    Baking chocolate can stand high heat.  It doesn't melt in the baking process.


    This is the recipe from Kin's book, Natural Breads Made Easy.  (天然麵包香 ~ 獨角仙@藍色大門.)  I am in the process of making this and will finish the post with my results tomorrow including any findings and photos.  :0)

    Natural Breads Made Easy.  (天然麵包香 ~ 獨角仙@藍色大門.)
    Bread Bake Off Update:

    I made a couple of boo-boos (a silly error - or in my case, THREE boo-boos,) when making this bread.  Firstly, when I had incorporated the pre-ferment dough to the dough mix, I thought the dough was too wet and sticky so I added a tablespoon of flour.  Then another and another.  I still had a sticky chewing gum type mass in the bowl - not elasticy and stretchy at all.  Then I realised I'd forgotten to add the butter, choc chips and candied orange!  The addition of butter usually makes the dough less sticky and easier to work with.  The fear of adding too much flour is that the ratio of flour to water is altered and can result in a tough, drier bread.

    My second boo-boo was not greasing the loaf tins properly.  One has a non-stick finish so no probs there.  The other tin was probably not greased carefully enough and the sides of the bread stuck to the pan!

    Now, I'm not entirely sure what I did wrong but the bottom of the loaves are indented.  It looks like the dough did not touch the bottom of the tin.  I don't know whether that was me not putting the dough in very well into the tins or whether I took the bread out to early to see if it was ready.  I baked as instructed for 30 minutes and tipped the longer loaf out to tap the bottom.  I was surprised to see the bottom of the dough did not touch the bottom of the pan and so was soft and spongy.  A hollow sound when tapped indicates the bread is cooked.  The breads were already looking rather browned on top so I lowered the shelf and turned down the heat a little.  I baked for a further 15 minutes.  This time I checked the shorter loaf tin.  This bread was stuck to the sides.  (Did I forget to grease this?)  Again it had a puckered base.  Into bake again for a further 15 minutes.  They looked finally ready although the bases still hadn't recovered fully.  Have not seen this before and not sure what had caused it.  Still sliced and tasted lovely.  Love the dark choc chips in the loaf but I'm not sure where the candied clementine went?  I would add another candied clementine next time and go easy on adding more flour.  The bread has a good chew to it may be a result of the flour I was adding.   Maybe you'll do a better job than I did!

    My blog friend Everybody Eats Well In Flanders made this in tandem this weekend as I posted the ingredients and recipe before I completed the loaves so she could bake it too.  Her hand-held mixer died on her in the process but she still made an excellent loaf.  Her version she called Orange Marmalade Loaf as she omitted the chocolate chips.


    Bread is slightly over fired but it gave it a nice crunchy crusty top.


    Not sure what I did wrong but the base of the bread is puckered.


    Despite my errors, the bread does have minute bubbles running through it.

    Thursday, 23 September 2010

    Earl Grey Tea Milk Loaf 伯爵奶茶麵包

    White Toast

    Been playing around with flour and yeast again today.  I needed a break from cake making as I've made ummmm.... five six cakes in the space of a week?  I had a trial run for a sponge baked in a roasting dish (wanted a shape that can be portioned easily) that ended up being a mango & cream filled sponge for Mum's b'day (belated as I was still "In Confinement" and wasn't allowed to go out and see her); a fruit pastry cake to take into work place to show off baby (I'm still on Maternity Leave); carrot cake for some friends that were visiting; a fruit filled sponge; chocolate chiffon filled with berries and cream (both sponges for my son's Full Month Celebration,) and another sponge filled with cream and fresh fruit for my "Uncle" (long-standing friend of my dad's who is like an uncle to us).  Good job I wasn't eating them all I'd soon look as if I was pregnant again!


    I made a batch of 17 hour pre-ferment dough (it makes enough for two 1lb loaves) and I used half to make White Toast (I still couldn't help adding extra flour to the wet sticky dough!) the other half was turned into Earl Grey Tea Milk Loaf.  I changed it very slightly as I forgot I was making half the quantity in the book and made the full amount of Earl Grey Tea Milk Concentrate (7 tea bags steeped in hot milk). As I was out of eggs (can you blame me after the marathon cake-a-thon the past week has been?!?!  Actually, the chickens out in the back garden have some - it was too wet and rainy this morning to go out just for 40 g of egg!?!!) I just used double the amount of milk tea concentrate and skipped the egg part.  I guess it would result in a more intense tea aroma to the finished bread.

    The recipe is again from Kin's Book, Natural Breads Made Easy.  (天然麵包香 ~ 獨角仙@藍色大門.)

    Looks like wholemeal bread but the colour comes from the brewed tea

    The finished loaf was beautifully moist and airy.  The scent of bergamot is apparent but is lost on eating.  However, there is a delicious - almost malty taste to the bread.  Certainly is different and I'm pleased with how it turned out.

    See the little bubbles in the bread? 

    The White Toast dough

    Cutting the pre-ferment dough in small pieces

    Adding the pre-ferment dough piece by piece

    Adding butter


    Butter kneaded until dough is of a stretchable consistency


    Earl Grey Milk Tea Bread 伯爵奶茶麵包

    Pre-ferment Dough
    bread flour             70%   464g
    water                    40%   265g
    sea salt                   1%   7g
    skim milk powder    2%   13g
    fresh yeast              2%   13g *

    Dissolve the yeast in water. Add bread flour, sea salt, skim milk powder and knead until soft. Cover the dough in cling wrap. Refrigerate to let it prove for 17 hours.

    * Author forgot to quote yeast in the book - I'm assuming it is 13g here based on her other recipes.
      
    Dough
    bread flour              30%   199g
    skim milk powder      4%   27g
    sea salt                      1%   7g
    sugar                        12%   80g
    egg                           12%   80g
    milk tea concentrate   12%   80g**
    fresh yeast                  1%   7g
    unsalted butter           10%   66g
    ground Earl Grey tea leaves 2%   13g

    **Milk tea concentrate: 133g milk, 20g Earl Grey tea leaves (I used 7 Earl Grey tea bags).  Heat milk and put in tea leaves.  Leave to brew for 15 minutes for thorough infusion.  Strain and take the amount required in recipe.  (I heated milk, added tea bags,, stirred with a spoon and left it to brew whilst I did the weighed the ingredients.  I squeezed the bags to extract the tea concentrate.)

    • Cut the pre-ferment dough into small pieces.

    • Knead all ingredients of dough together (except the butter). Add pre-ferment dough piece by piece.  Knead after each addition until soft and smooth. Add butter.  Knead until stretchable consistency.

    • Put the dough into a big bowl. Cover with cling wrap and let it prove for about 25-30 minutes.

    • Divide the dough into six small equal portions. Flatten each portion with your hands to drive the air out. Hand square it and cover with cling wrap. Set aside to rest for about 20 minutes.

    • Flatten each piece of dough with your hands to drive the air out. Roll each out into a rectangular sheet with a rolling pin. Fold about 2cm from both sides towards the centre and roll it out again.  Roll the dough up (the width should be the same as the loaf tin) and put them into the mould.  Cover with cling wrap.

    • Let it to prove for about 40-45 minutes or until the dough has risen to 80% of the depth of the loaf tin. Close the lid. Bake in a pre-heated oven at 170-180 deg C for about 30-35 minutes.