Wednesday, 16 January 2013

Upcycling: Making New from Old ~ Drawstring Bag


I haven't made a bag for some time.  I think last items made on the sewing machine were phone pouches about 18mths ago.  I often have ideas in my head or at least aspirations to make things but they do not often come to fruitition.

Hand drawn felt letters

Having enrolled son into Pre-School, I decided to dust off the machine to knock up a little drawstring bag.  They do have nylon material ones available to buy from the preschool for £2 but I thought I would make Minh a special personalised one.  Opening my sewing box full of patterns; fabrics; odds and ends, I came across a scrumpled old work shirt.  I put my creative head on and started planning...
I used the front of the shirt including the button front as it wouldn't be wide enough otherwise.  I just sewed the flaps down after cutting the material so even if the buttons were undone (or fell off) the bag would not open.

Button flaps stitched down in place
The bag needs to hold son's nappies, wipes and nappy sacks as well as a spare change of clothes.  No, we've not toilet-trained him yet.  With this in mind I thought about making a Flat-Bottomed Bag.  The contents could sit at the bottom nicely without tumbling about.

Flat bottom helps bag contents stayin one place!


I had to refer to this book Lisa Lam's Bag Making Bible - to remind myself how to do it.  I love this book as it's got great ideas how to customise bag's you are making to have features that you want as well as some projects for you to tackle.  (Lisa Lam also has a fabulous Bag Making Blog  ~ U-Handblog as well as a shop ~ U-Handbag.com.)

The shirt material is quite flimsy so I gave it reinforcement with some heavy sew-in interfacing and also made a lining from some calico fabric.  I could have made drawstrings from the same material as the shirt but as time was against me, I found some light blue ribbon to thread through as ties instead.


I am really pleased with the bag as the interfacing has made the bag look more substantial, the lining makes it look classy.  The design I think is quite cute and I love how the lettering turned out! 

A label added in last minute!


Tuesday, 1 January 2013

Post Christmas Feasts

After some Christmas Feasting at my mother's house - a yearly tradition for Christmas Day Turkey lunch and Boxing Day Chinese Feast (lobster/crab in Spring Onion and Ginger, Chinese Roast Duck, Roast Crispy Pork are definite contenders), we were lucky enough to be invited to two other feasts over the weekend.

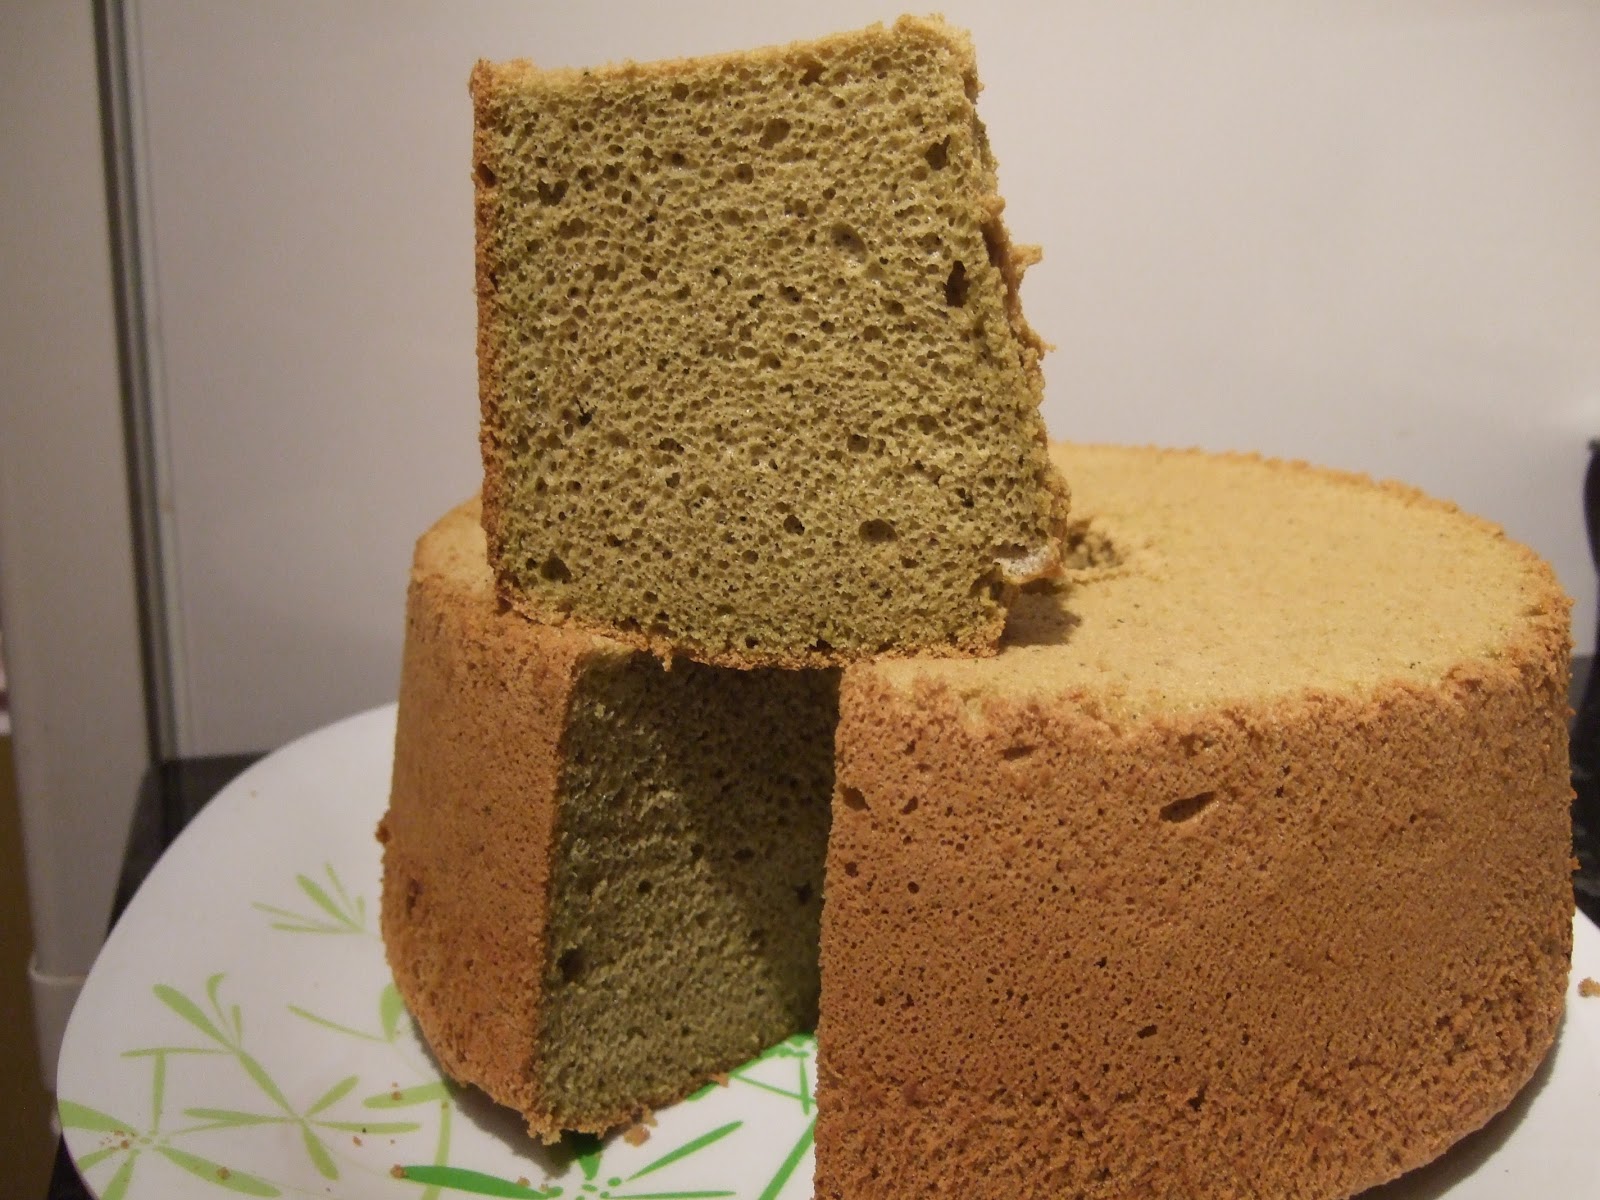
I recently learned that one of my cousins will be going away to work in February and it's been long talked of having a Steamboat Feast.  One of our other cousins hosted the meal at their place and as I like to bring a little something along, I baked a Green Tea Chiffon for dessert.  Post for that one is here.  I have discovered that I omitted to take photos of our feast :(   But I will tease you by telling you that we had three different kinds of noodles; 3 different greens (pak choi/cos lettuce/chrysanthemum greens); 3 different meat balls (fish/pork and beef); thinly sliced beef rolls; fresh prawns; fresh clams; mushrooms (brown chestnut and golden needle-enoki).  The Steamboat pot was split in two compartments and we had two types of broth, one was a herbal tonic, the other plain.  The herbal one was delicately flavoured with nutmeg, cardamon, and dong quai.  It was a delicious and filling feast indeed!

Sunday, we went to visit Mr Leaf's family.  We went out for lunch at a Vietnamese Restaurant, Loong Kee on Kingsland Road, Hackney.  It's one of the few places that serve Steamed Rice Rolls Bánh cuốn which is a favourite with Mr Leaf.  They are similar to Cheung Fun but the rice skins are thinner, more translucent and not as soft.  The filling was a scarce scattering of minced pork and minced black wood ear fungus.  Was not very flavourful on its own and needed the Nước chấm sauce to give it some life.


Mr Leaf's brother likes Frog's Legs so we ordered a starter of Fried Frog's Leg's with Salt and Chilli.  The frog meat tastes between fish and chicken.  

Mr Leaf and his brother always eat this noodle salad dish Bún Thịt Nướng which is topped with grilled pork.  It's rice vermicelli with shredded salad, herbs and whatever topping you select and sprinkled with roasted crushed peanuts (which they did not have in this place.) You moisten it with Nước chấm  mix it up and chomp away.  This is not where we usually go for our Vietnamese meals and Mr Leaf reported the pork not the same cut and taste as his usual choice of restaurant.
I opted for stir-fried rice noodles with mixed meat.  Expecting Ho Fun wide, flat rice noodles like I would in a Chinese Restaurant I was surprised to get very thin rehydrated noodles.  It had a pleasant chew to them and I had all manner of different vegetables stir fried with it (no bad thing in my book).  Son managed to eat a few mouthfuls too so that was a bonus as he is a very discernible diner.

Sister in Law (Mrs Leaf) had Beef Phở.  Noodle Soup in a beef broth with sliced onion, herbs, thinly sliced beef.  It's served with a plate of accompaniments, herbs, raw beansprouts and a lemon wedge.  


In the evening we went to my SiL cousin's house for a pre-New Year Dinner.  We had Coquille St Jacques to start (oops - no photo) which is a French dish of scallops in a white wine sauce served in the half shell topped with mashed potato and grilled. Mains were Steak or Thai Chicken Curry.

Here are a few photos I did remember to take!

Pan-Fried Steak with mixed salad and mashed potato.


I had the Thai Curry, there was Red and Green Curry and I had a little of both.  The Green Curry was particularly fiery hot but wonderfully fragranced with kaffir lime leaves, I couldn't tell you how the Red Curry tasted as my mouth was on fire after that!


We had Christmas Cake for dessert (which I had made and decorated) as well as Strawberry Gateau (I believe it was a shop-bought frozen dessert).


I hope you all had a lovely time celebrating the festivities with your nearest and dearest!  


The hostess pictured with my son and his cousin. 

(Apologies for poor photo quality - my camera phone does not perform well.)


Monday, 31 December 2012

Green Tea Chiffon


We were invited to my cousin's for a Post-Christmas Steamboat/Hot Pot dinner so I thought I'd whip up a cake.  I decided on a chiffon cake as I wanted it to be light, fluffy and not overly sweet.  I decided on Japanese Green Tea as my flavouring and set to work on looking for a recipe.  I used this one here to base my recipe on.

Green Tea Chiffon Cake 


6 large free-range eggs (separated)
150g caster sugar
1/4 tsp cream of tartar
60ml sunflower oil
30ml cold water
30ml milk
120g self-raising flour
3 level tsp ground green tea powder


Sift the flour and green tea powder together 3 times and set aside.  Weigh out 100g the caster sugar and place in a small dish/saucer.

Place the 6 eggs whites in a scrupulously clean, grease-free bowl and whisk until large bubbles form.  Sprinkle in the cream of tartar and continue to beat (I use the whisk attachment of my hand blender) until white and fluffy.


Add 100g of the caster sugar a quarter at a time into the whites and beat in fully before adding another quarter.  When the 100g sugar is added, continue to beat until the whites are glossy white and are fairly stiff. The whites need to be able to hold their shape and will not fall out of the bowl if the bowl is upturned.

Add the remaining 50g caster sugar to the 6 egg yolks and beat until thick.  Add in the oil and beat for a couple of minutes more until it is incorporated.  Add the milk and water and mix in (it does turn back to liquid.)  Sift in the flour and green tea powder and mix in until there are no traces of flour left.

Scoop a quarter of the egg white mix into the cake batter and mix in to loosen the batter.  Take another quarter and fold in lightly with a large metal spoon.  (I use a large plastic serving spoon.) Continue with the remaining egg whites folding in so that the whites mix into the batter but be careful not to knock the air out.

Pour the mixture into an ungreased chiffon tin (mine is 23cm wide at the top and 20cm wide at its base).
Bake at 170 C for 45-55 minutes.  The chiffon will be ready when a skewer poked into the cake comes out clean with not wet sticky mix on it.  If cake browns too quickly, lower the temperature slightly and continue to cook.

Invert the cake immediately to cool.  (I balanced the central tube of the pan on a small tin.) Remove the chiffon cake when it has fully cooled.

***Notes:
I would reduce the sugar next time to 130g and increase the green tea powder to 5 level teaspoons as although it looked nice, the taste was quite mild.


Happy 2013 !

A simple design of ice blue fondant and sparkly snowflakes.
(Photo does not reflect the true colour or the sparkly effect )


A fun snowball scene
Crikey! How time flies!

Three years ago I started this blog to record my odd ramblings, my son growing up, my baking endeavours and gardening adventures.  Garden hasn't had a lot of exposure on here - probably due to a lack of me being in it! Baking, well - I'm always in my kitchen baking away :p

Here's a look back at our Christmas 2012 seeing as I was too busy baking to stop and blog :(


No icing or marzipan for this one - dried fruit and nut topping


Gold Star Wreath
I made several Christmas Cakes this year to gift to friends and family. Each one has been decorated differently and it was a joy to do!


Home-made mincemeat and home-made gluten-free pastry

I had a pre-Christmas Meet with some of my Mummy friends - we met because we were expecting our little people 2 or so years ago and have stayed firm friends and our little ones play together too!  One of my friends is gluten intolerant and vegetarian so I made these Gluten-Free Mince Pies so she could indulge in the festive season!


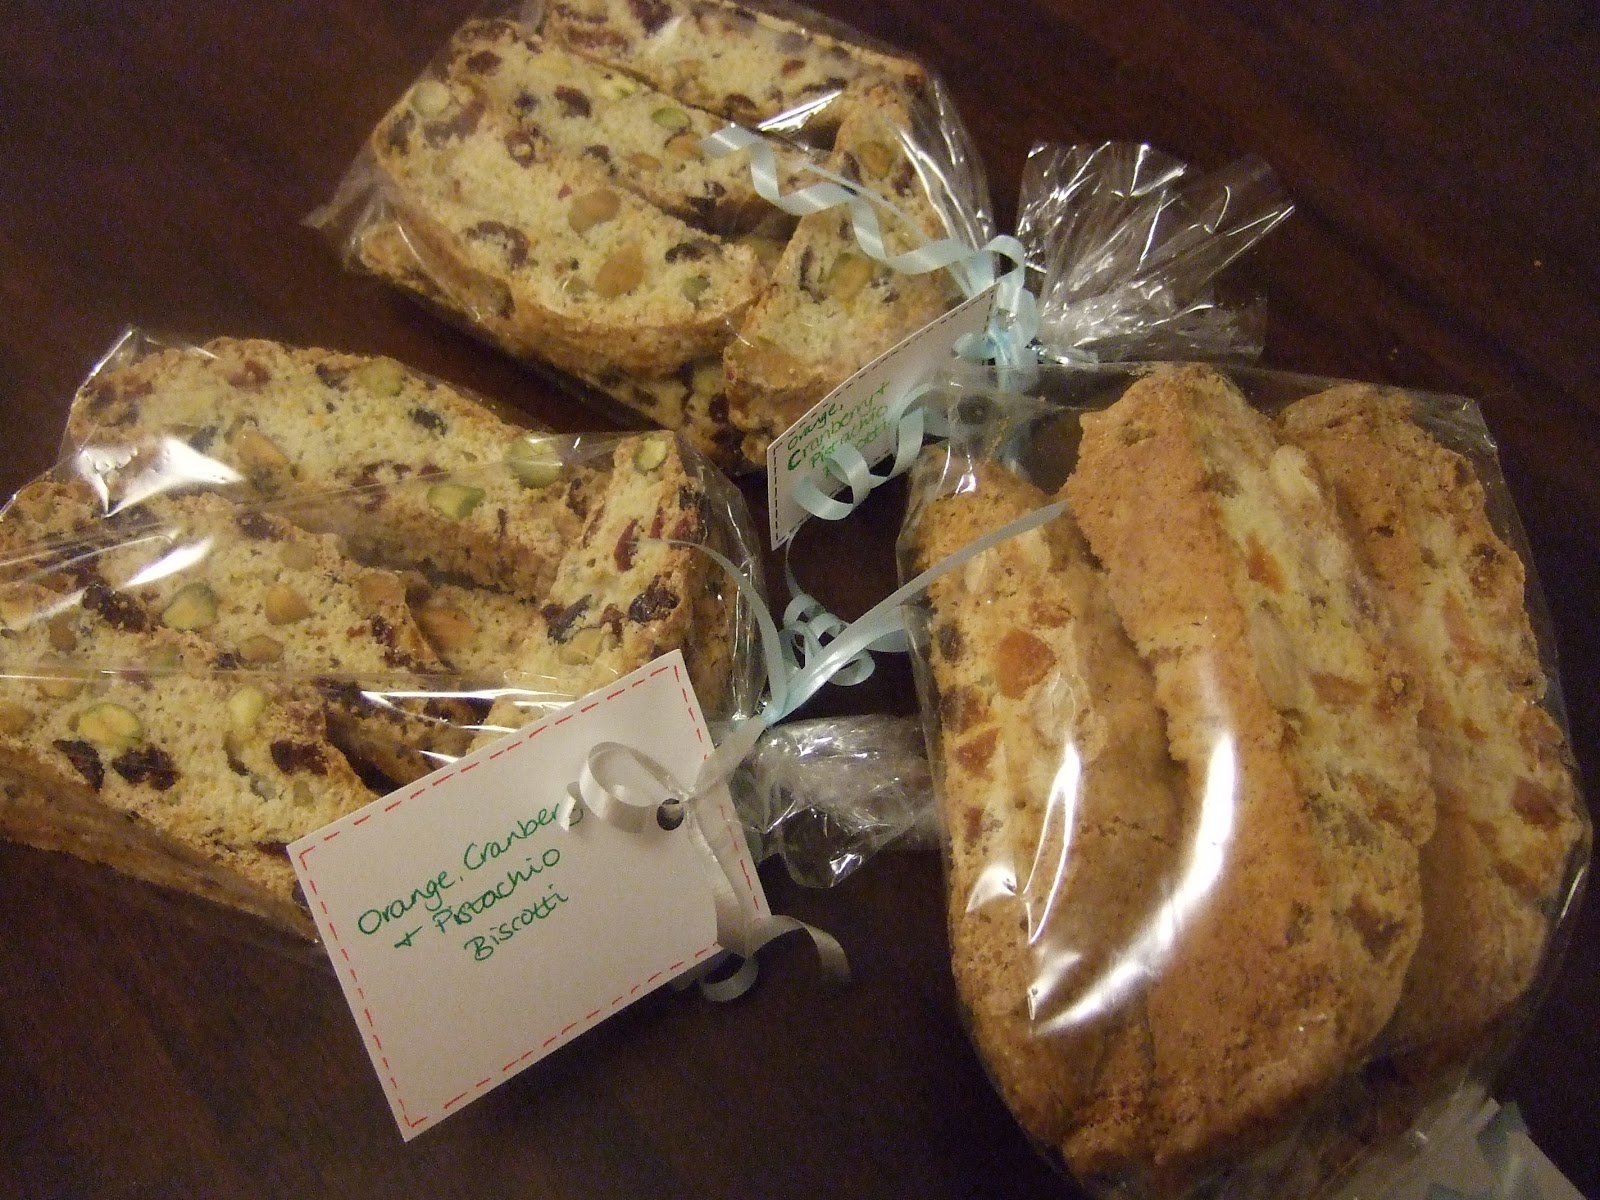
The package on right is Gluten-Free Biscotti ~ Apricot and Almond
I do like to bake and share so I have been biscotti crazy again this Christmas concocting different combinations of fruits and nuts into biscotti so I can package and give to friends.  It certainly guarantees a smile on people's faces!


It was fun decorating these trees with my son 
I try not to leave the little people out where I can so I made some Gingerbread Trees and People for a few of my friends - oh and of course, for the little person here too :D  Although I secretly think my son enjoys the  "Smarties" (Chocolate Beans) more than the gingerbread itself! 


My personal project this Christmas was to create a Gingerbread Scene - 3D of course!

My Gingerbread Display I made for my son and niece - we ate the gingerbread after Christmas!


Thank you to you all for reading!
May 2013 bring you much baking / cooking / crafting / gardening adventures!


Wednesday, 28 November 2012

Steamed Cake - Mini Vanilla Cakes

Having been invited by Miss B of Everybody Eats Well in Flanders to enter the Aspiring Bakers Steaming Hot Cakes Event, I have been thinking of what to make.  I've never attempted a steamed cake before and am assuming most cake recipes work whether you bake or steam?  Although cooking times may vary I'd imagine.


Recently, I've been baking biscuits or baking Madeleines and even bread or buns.  I had Kenwood Mixer out today so I thought I would whip up some Madeleines for my son - he loves his "Boat Cakes".  My Madeleine mould would not fit in my largest pot/wok so I decided to use silicone cake cases & steam them in a bamboo steamer over a wok.

I wondered if they'd be like Chinese Steamed Sponge: Ma-Lai Goh 馬來糕 but it is not nice, bubbly and fluffy like one.  I tink the Madeleine recipe is too dense for that kind of texture - too much flour.  Anyway, it has a nice flavour all the same and makes you think you are eating something healthy! (?!!)


Recipe is as pretty much similar to how I made Madeleines before.
Airy, but lacking big bubbles

Mini Steamed Vanilla Cakes

3 free range eggs
100g caster sugar
200g plain flour
10g baking powder
1 teaspoon Vanilla Extract
20g honey (I used a set honey but otherwise a runny one will be fine)
60ml milk
200g butter (melted, cooled)

Whisk the eggs and sugar in a large bowl until pale and thickened.


Add the milk and honey to the melted butter and mix.


Pour the melted butter mix into the egg batter but down side of bowl.  Be delicate with the whipped egg and air mixture! Add vanilla.


Sift in half the flour and baking powder and fold gently.  Sift in remaining flour and baking powder and fold.

Place a tablespoon of mixture into a small silicone cupcase.  Place the cases into a bamboo steamer and replace the steamer lid.  I used to lid to prevent condensation droplets making the cake tops soggy.  Steam over medium heat f or 15 minutes.


I am submitting this post to Aspiring Bakers #25 - Steaming Hot Cakes (November 2012) hosted by Miss B of Everybody Eats Well in Flanders.  Link HERE 


Thursday, 15 November 2012

French Madeleines

Perfect little cakes for afternoon tea, with friends or for little fingers!

It seems that I have introduced a new favourite cake with my son - French Madeleines.  They are little shell-shaped cakes that are buttery and very delicious!  They usually have a characteristic 'bump' too - like a fat belly!  I struggle to achieve the bump on my cakes but they taste nice all the same!  Oh, and to my son, these shell-shaped cakes are "little boats" :)

The recipe I have used is adapted from BBC website "Madeleines with lemon curd" - but there are many around on the 'net.  Use whichever one you like the sound of :)


The closest I can get to achieving a "bump"

Orange Scented Madeleines


3 free range eggs
100g caster sugar
200g plain flour
10g baking powder
1 orange (grated zest)
20g honey (I used a set honey but otherwise a runny one will be fine)
60ml milk
200g butter (melted, cooled)

Whisk the eggs and sugar in a large bowl until pale and thickened.

Add the milk and honey to the melted butter and mix.

Pour the melted butter mix into the egg batter but down side of bowl.  Be delicate with the whipped egg & air mixture! Add the grated orange zest.

Sift in half the flour and baking powder and fold gently.  Sift in remaining flour and baking powder and fold.

Leave the batter to rest in the fridge for an hour or overnight.  (Not sure why - but different sites say it helps achieve the "bump" on the madeleines.)

If you are like me, you cannot wait to bake your little nuggets of buttery delights. ;)
So turn on oven to Gas 5/190C/375F.  While oven is heating up, butter and flour your madeleine tin.  I have a silicone ones in different sizes.  I also use a mini-teddy bear tin.  The flour is very important as it makes it easier for the cakes to fall out from the tin after baking.  Trust me on that one!  I made the mistake of only greasing the teddy bears one morning and YUP! Half the teddies stuck to the tin DESPITE it being "non-stick".

For my larger madeleine shells, I put about a dessertspoon of mix in each shell.  You are aiming for 80% full and not too worry about making it even as the baking levels it out.  For mini-madeleines or mini-teddies, then I go for a teaspoon of mix.

Bake for 7 minutes, then turn oven off for 5 minutes (apparently, this creates the "signature bumps" - mine do get a small bump not a great big one).  Turn oven back on but this time at Gas 3/160C/325F.  Bake for a further 7 minutes.  The shells should just be tinged brown on the outsides.  For my mini-sized moulds I bake 5 minutes, rest 5 minutes then continue with a final 5 minutes.  Cool the tin for a few minutes before turning out onto a cooling rack.  The silicone madeleines should fall out easily but a prod from the underneath helps any disobedient cakes.  For my teddy tin (as it's metal) a sharp tap on the cooling rack sends any teddies tumbling out of their beds!  (Provided I greased and floured the tin!)

Baking these little cakes in a metal tin gives a more evenly brown colour than in silicone


You can just make out the little bear's face 
A fat belly appearing on the bear!
I usually bake a batch of madeleines so my son can munch on them.  The remaining mixture is placed in a bowl, covered with cling film and is baked the following morning.  The tin should be washed and dried before re-greasing and flouring when baking another batch.

* Greasing and flouring.  I rub butter using fingers or a piece of buttery paper in the nooks and crannies of the tin.  I sprinkle flour in each indentation and shake the tin in every direction to coast the buttery surface with flour.  Finally tap any loose flour away.
With a silicone mould, I do the same buttering process but to distribute the flour I fold the silicone mould in half and shake/clap the mould to get the flour coated inside.  Shake any excess flour off before filling.

I have made these with lemon zest before and with green tea powder (I added about 1 teaspoon of ground green tea with the flour).  I haven't tried chocolate as yet but I would substitute 25g flour for 25g cocoa powder.


Wednesday, 29 August 2012

Swiss Roll (filled with cream and fresh fruit)


I don't make Swiss Rolls because I am awful at them.  My late Grandfather (mum's side) was a baker and would make Swiss Rolls filled with Buttercream and sell them to the local Chinese Supermarket.  When he came to visit us I would love to watch him whip eggs sugar and flour into fluffy creations.  I did not possess his skills.

Determined not to resort to a shop-bought cake for hubb's (Mr Leaf) birthday, I was trying to come up with a cake that wouldn't be too sweet or too large.  Whilst internet browsing I came across a Raspberry Swiss Roll recipe by one of my favourite chefs James Martin.  I had intended to make this at my mother's yesterday (hubb's actual birthday) but was too busy.  So I set to work in the kitchen today.

I was pleased with the outcome as it did not crack or split on rolling :)  I didn't see bubbles of flour on the base of the swiss roll (as in previous efforts).  I hope my Grandad would be proud of me :)

My mum has raspberry bushes in her garden and they are in season now - I was going to put fresh raspberries in the filling with the cream but seeing as I forgot to pick any to take home I had to rumble in the fridge to see what we had.  This Swiss Roll is filled with Homemade Raspberry Jam, Vanilla Cream, White peach and Mango.


The sponge for the swiss roll is simple, just 3 ingredients; eggs, caster sugar and self-raising flour.  It's very light and spongy but is fat-free so does not keep well.  It is not as moist and pillowy as a chiffon either - makes the addition of cream and fruit seem less guilty! Heh Heh Heh!


Recipe for the Swiss Roll is here: http://www.bbc.co.uk/food/recipes/raspberry_swiss_roll_08757