Showing posts with label Chocolate. Show all posts

Friday, 15 March 2013

Chocolate Sandwich Cake with Chocolate Butter Icing

This cake is quick to whip up and is extremely light and crumbly.  Bit too crumbly but not dry.  I made a Victoria Sandwich Cake this afternoon as we were going to pop over to a friend's and say "Hello."  I had told Mr Leaf (hubbs) we would have the cake to look forward to when we came home.  I actually changed my mind, wrapped it up and gave it away to friends.  I thought the boys would enjoy chocolate cake more anyway.


Chocolate Sandwich Cake

Ingredients (Cake)
115g margarine (I used Stork)
100g caster sugar
2 large free-range eggs
25g cocoa powder
90g self raising flour
1 level teaspoon baking powder
Filling
30g butter (soft)
15g cocoa powder
60g icing sugar
2-3 teaspoons milk

2 x 7" sandwich tins, greased and base lined with baking parchment

Method
Pre-heat oven to Gas 4/180C.

Beat the margarine in a large mixing bowl for a few seconds until it is soft and smooth.  Add the caster sugar and cream until pale, light and fluffy.

Crack an egg into the mix and sift in the cocoa powder, lightly mix until it is all combined.  Add in the remaining egg and sift in the flour and baking powder.  Fold it all together until combined.  Do not beat the mixture as you may make the cake tough and dense.

Spoon into the prepared cake tins and level.  

Bake in the pre-heated oven for 15-20 minutes.  (Mine took 18 minutes.)  The cake should begin to shrink from the edges of the tin when it is ready and the centre feel springy to the touch when pressed lightly with your finger.  A skewer (or toothpick) should come out clean when inserted in the cake.

Turn out on to a wire rack to cool. 

To make the chocolate butter icing, put the soft butter in a bowl and beat until smooth.  Add in the cocoa powder and icing sugar.  Slowly cream the butter with the sugar and cocoa until it has all combined.  Beat until it is smooth and fluffy.  If it seems to stiff and dry add a little milk to the mix and beat well.

When the cake has cooled place one layer onto a plate flat side up.  Spread the chocolate filling on the base before topping with the other cake (domed side up).  Dust with icing sugar to serve.


Thursday, 14 February 2013

Happy Valentine's Day


Happy Valentine's Day !

Almost didn't have one - both boys been terribly ill here past 2 weeks and although it was nice to prepare what I wanted to eat to begin with.  Watching the boys hardly eat, drink and just nap all day soon sapped my appetite from me.
So hard to find inspiration to cook when people have diminished appetites :(

Hoping they are now on the mend and so I cooked Mr Leaf's favourite food - Duck Breast.  As we were going to have it on rice, I made the sauce a Chinese inspired one with Chinese 5-Spice and Honey.


Both my boys are chocoholics.  What better dessert than Hot Chocolate Sponges?


Hope you had a good evening with your loved one if you celebrate Valentine's Day :)

Thursday, 15 November 2012

French Madeleines

Perfect little cakes for afternoon tea, with friends or for little fingers!

It seems that I have introduced a new favourite cake with my son - French Madeleines.  They are little shell-shaped cakes that are buttery and very delicious!  They usually have a characteristic 'bump' too - like a fat belly!  I struggle to achieve the bump on my cakes but they taste nice all the same!  Oh, and to my son, these shell-shaped cakes are "little boats" :)

The recipe I have used is adapted from BBC website "Madeleines with lemon curd" - but there are many around on the 'net.  Use whichever one you like the sound of :)


The closest I can get to achieving a "bump"

Orange Scented Madeleines


3 free range eggs
100g caster sugar
200g plain flour
10g baking powder
1 orange (grated zest)
20g honey (I used a set honey but otherwise a runny one will be fine)
60ml milk
200g butter (melted, cooled)

Whisk the eggs and sugar in a large bowl until pale and thickened.

Add the milk and honey to the melted butter and mix.

Pour the melted butter mix into the egg batter but down side of bowl.  Be delicate with the whipped egg & air mixture! Add the grated orange zest.

Sift in half the flour and baking powder and fold gently.  Sift in remaining flour and baking powder and fold.

Leave the batter to rest in the fridge for an hour or overnight.  (Not sure why - but different sites say it helps achieve the "bump" on the madeleines.)

If you are like me, you cannot wait to bake your little nuggets of buttery delights. ;)
So turn on oven to Gas 5/190C/375F.  While oven is heating up, butter and flour your madeleine tin.  I have a silicone ones in different sizes.  I also use a mini-teddy bear tin.  The flour is very important as it makes it easier for the cakes to fall out from the tin after baking.  Trust me on that one!  I made the mistake of only greasing the teddy bears one morning and YUP! Half the teddies stuck to the tin DESPITE it being "non-stick".

For my larger madeleine shells, I put about a dessertspoon of mix in each shell.  You are aiming for 80% full and not too worry about making it even as the baking levels it out.  For mini-madeleines or mini-teddies, then I go for a teaspoon of mix.

Bake for 7 minutes, then turn oven off for 5 minutes (apparently, this creates the "signature bumps" - mine do get a small bump not a great big one).  Turn oven back on but this time at Gas 3/160C/325F.  Bake for a further 7 minutes.  The shells should just be tinged brown on the outsides.  For my mini-sized moulds I bake 5 minutes, rest 5 minutes then continue with a final 5 minutes.  Cool the tin for a few minutes before turning out onto a cooling rack.  The silicone madeleines should fall out easily but a prod from the underneath helps any disobedient cakes.  For my teddy tin (as it's metal) a sharp tap on the cooling rack sends any teddies tumbling out of their beds!  (Provided I greased and floured the tin!)

Baking these little cakes in a metal tin gives a more evenly brown colour than in silicone


You can just make out the little bear's face 
A fat belly appearing on the bear!
I usually bake a batch of madeleines so my son can munch on them.  The remaining mixture is placed in a bowl, covered with cling film and is baked the following morning.  The tin should be washed and dried before re-greasing and flouring when baking another batch.

* Greasing and flouring.  I rub butter using fingers or a piece of buttery paper in the nooks and crannies of the tin.  I sprinkle flour in each indentation and shake the tin in every direction to coast the buttery surface with flour.  Finally tap any loose flour away.
With a silicone mould, I do the same buttering process but to distribute the flour I fold the silicone mould in half and shake/clap the mould to get the flour coated inside.  Shake any excess flour off before filling.

I have made these with lemon zest before and with green tea powder (I added about 1 teaspoon of ground green tea with the flour).  I haven't tried chocolate as yet but I would substitute 25g flour for 25g cocoa powder.


Thursday, 2 August 2012

A Passion For Baking - Cake Competition


Jo Wheatley is the winner of Great British Bake Off Series II (2011).
The show takes non-professional bakers and puts them through a series of challenges and each week a contestant is eliminated.  The next series is due to be aired in a few weeks time and I am looking forward to watching it!

Jo has recently published her book, A Passion for Baking and it's a well written book.  No long and fancy ingredient lists and most of all, I love it when the author adds a note about the recipe, whether it's one of a family member's favourite or a creation for a get-together with friends.  It is like the author is sharing a bit about their life and I like that friendly touch. :)

So, to celebrate her book launch, Jo hosted a competition ~ the prize was to win a day on one of her Masterclasses that she runs from her home.  We were to bake the Chocolate Birthday Cake from her book and include the book in the photo to show that we had followed her recipe.

Here was my take on it:


I made modelling chocolate with dark and then white chocolate which I used to hand make some roses, leaves and butterflies.  Modelling chocolate I've said somewhere else before is really odd stuff.  Its stiff and hard yet gets greasy when warm.  Not fun at all.
The cake was filled with chocolate ganache which piped in rosettes and attempted piped roses (like they do on cupcakes with butter-cream) I don't think my nozzle is quite the right shape :p  I decided last minute to make some  honeycomb (also known as cinder toffee, hokey-pokey).  This was fine except that overnight in a cake it kind of melts and ends up being like chewy toffee.

It was a great recipe but I think my execution was wrong.  I don't think my oven works that well and when I checked the cake after its allocated baking time it was definitely not ready.  I ended up over-baking it :(
Piped chocolate ganache swirls was a bad idea too as its pretty firm on cooling and it meant the cake was hard to slice.  The knife couldn't cut through the ganache and so would drag it down squashing the cake.  Perhaps I should have used a hot knife?

Nevertheless, I entered the competition.  I didn't win or get chosen as one of the six finalists.  The cake looked pretty though :p  Oh, I think it coincided with Father's Day as well as my neighbour's birthday so we shared some cake with our neighbour too :)


Sunday, 15 July 2012

Birthday Cakes


Just a few pictures of some of the Birthday Cakes I've made...

This is a marbled vanilla and chocolate Rose Cake covered in Pink Strawberry Chocolate Ganache.
Sweet for a 9 year old's birthday :)


This was made for one of my friends.  As you can tell it was her daughter's 1st birthday.  I like when people aren't too specific with their cake demands as being a novice - I'm not sure what I can create!
This had the requirements of being pretty but not pink!  I enjoyed making this one - even cutting up a large rectangular cake into a number one shape! 
The cake is a fondant iced, vanilla sponge filled with home-made jam and buttercream. 

Close up of Butterfly and Daisy


This was a surprise for my husband's work colleague.  I wanted to try out a chocolate cake recipe and practice modelling chocolate for the first time.  Not sure I enjoy working with modelling chocolate.  Very strange substance.  Was the first time using chocolate pouring ganache but that was fun!

I have also made some novelty cakes in the form of characters - but I will have to find those photos :)
Oh, & I must find you photos from my son's first birthday - last year :p  He will be TWO soon!!!


Tuesday, 12 June 2012

Chiffon Cake Photos II


These are taken from the digital camera - hopefully better picture quality than the camera phone!


Here is a Gluten-Free Lemon Chiffon. I have a gluten intolerant friend and I made this cake as a treat for her.  She was having a stressful day decorating a 2-tier surprise birthday cake for her mum and I wanted to bring a smile to her.


This is the Mango Chiffon I created for my birthday.  It still stands fairly tall baked in a round springform tin despite not having a central tube to climb up on during baking.  I think this was a 9" cake.  It was also another gluten-free chiffon.


Ideally, I should've used more cream to top cake with but I wanted it to be not as sinful as I had a friend who was on a diet - too much cream and she may not even try it!


My gluten intolerant friend enjoyed the lemon chiffon so much she asked me to make another but fill it with cream, raspberries and strawberries for her partner's birthday.  I would like to have glazed the fruits but sometimes you have to go with what the customer wants!


Chiffon Cake Photos

These are a selection of photos taken from my camera phone (hence not great pictures and lighting).  Most have these have been celebration cakes and dressed with fruit and cream.


I made this as a surprise for a friend's 30th Birthday (July 2011)


This was for my niece's 3rd Birthday in March 2012. A Vanilla Chiffon, split in 3 layers.


Just to show you how tall my chiffon cakes usually rise - 4 egg mix in a 9" springform pan.


Mango Chiffon made for my birthday (April 2012).  Only a skimpy amount of cream as a friend was on a diet!


A Banana Chiffon I made for my mum's work - smells so good my son wants some!

Lovely, tall and airy.  I think I didn't invert this one quick enough as the top has dipped slightly and you can see the bubbles are squashed.  (Cake is inverted to serve so top of cake is actually on the bottom.)

Chiffon cakes can be successfully made using gluten-free flour! A lemon chiffon filled with fresh raspberries and cream as per my friend's request.


Monday, 11 June 2012

Chocolate Chiffon Cake

Chiffon cakes is the number one cake I turn to if making a celebration cake with fruit and cream.  Its light airy layers are simply a delight to eat and sandwiched between luxuriant cream and fragrant fruit it gives you a feeling of real indulgence!  Of course you can eat chiffon cakes as they are - plain.  The moist yet light, springy texture slips down easily and you crave for another wedge! ;)

I saw several chiffon cakes posted recently (well, as in within past 3 months :p ) and it re-ignited an urge to bake a chiffon cake.  Since then I have lost count of how many I made.  Let's think now...  There was a vanilla one with cream and fruit for my niece's 3rd birthday... a chocolate one with chocolate cream for my mumma friend's birthday... I had a mango one with mango and cream... I made a plain lemon gluten-free one as a treat for a friend (she in turn asked me to make one for her partner's birthday, another gluten free lemon chiffon but decorated with cream and fruit)... I made a plain banana one for my mum to enjoy at work... and today I hastily whipped a chocolate one for my neighbour's birthday.  They had invited us to a BBQ at theirs and I don't like going to friend's places empty-handed.

It's my trusted chiffon recipe that I now tweak here and there to suit the flavour I'm making.  I think I rushed this one as it did fall out of the tin whilst cooling (which incidentally, NEVER happens).  I could have been upset about it but frankly, it was going to be filled with cream and topped with chocolate - it wasn't going to be a show-stopper but I believed I could patch it with cream and it'd be OK - edible at least. :)
Cream and ganache - a wonderful duo for hiding inconsistencies!

The recipe is originally from Sea Dragon: as I say, I tweak bits, but essentially, it's based on his recipe.  I have tried to take photos along the way to describe the stages as I know some people are daunted by chiffon cakes.  Below is what I used today.

Chocolate Chiffon Cake

Cake:
4 egg yolks
60g caster sugar
85ml sunflower oil
30g cocoa powder
125ml water
100g plain flour
2 level teaspoons baking powder
4 egg whites
1/4 teaspoon cream of tartar
Filling and topping:
50ml double cream
100g milk chocolate (broken into squares)
150ml double cream
2 small (37g) bags of Malteasers (chocolate covered honeycomb balls

Preheat oven to 180 deg C.  I used a 10" round springform tin as I was willing to sacrifice depth of size of cake.

Sift flour, cocoa and baking powder 3 times and set aside.

Using a stand-alone mixer, or an electric hand-whisk, whisk egg whites until foamy (think large washing up bubbles).  Add cream of tartar and continue to whisk until thick and white. Add the 120g sugar a quarter at a time while whisking until meringue is glossy and thick. The mixture should be able to hold its shape but not be too stiff or dry, the whites will not fall out of the bowl if inverted either.  If the whites are too stiff and dry, it will take a little more effort to combine them into the cake batter.

Whisk egg yolks and 60g of sugar until pale, thick and creamy.  The mix should leave a trail for a couple of seconds before disappearing into the mix when the whisk is raised.  Slowly add the oil as you continue to whisk - it will still stay lovely and thick.  Mix in the water.  Sift in the flour mix in 3 batches and fold in until combined.

Add 1/4 of the meringue into the cake batter and using a large spoon (I use a serving spoon), mix in the meringue to loosen the batter.  Add another 1/4 of the meringue and fold gently until combined.  Repeat until all meringue is incorporated into the cake batter.

Pour into the cake tin.  (If making a plain chiffon I use a chiffon tube pan, if decorating with cream I tend to use a 9" or 10" round springform tin so I don't get a hole in my cake from the tube.) Lift the cake tin about 2 inches above the counter top and drop tin on counter.  This helps remove any large air bubbles.

Bake for about 40 - 55 minutes until a skewer inserted in middle comes out clean.  Immediately turn the tin upside down with the cake still in it to cool.  You can support the tin on the edge on tin cans to allow air to circulate under the cake.  If using a chiffon tube, I insert the hole of the tube onto a wine bottle (with liquid in it!!!) and allow the cake to balance on the neck of the wine bottle to cool.  Leave to cool completely.

Put 50ml cream in a microwaveable bowl.  Heat in microwave for 30-40 seconds until cream is hot but not boiling.  Add the squares of chocolate and stir.  If there are still lumps of chocolate that won't melt, place in microwave for further 10 seconds.  Stir until smooth, then leave aside.  This is chocolate ganache.

Whisk the remaining cream until firm but not stiff peaks.  Using the side of a large bladed knife or a rolling pin, crush one bag of Malteasers until broken.  Fold Malteaser pieces into the cream and chill.
When cake is completely cold to the touch, split into 2 layers and sandwich with the Malteaser cream.

Give the ganache a stir before pouring ontop of cake and spread to cover.  Decorate with remaining bag of Malteasers.  Chill before serving.

The chiffon is usually higher than this but I think I measured my flour out wrong!
As I mentioned, my cake fell out of the tine during cooling.  I flipped the tin the right way up and tried to put the cake back into the tin.  The cake somehow cracked into 3 wedges!  I ran a thin spatula round the inside of the tin to loosen the edges before removing the springform collar.  I then slid the spatula under the cake to remove it from the base of the tin.  I assembled the wedges the best I could before proceeding to split, fill and decorate the cake.  I was hopingthe cream and ganache would patch and hide the cracks!  It wasn't the best looking chiffon I'd made but resembled a whole cake at least!

I'll do a post with step-by-step pictures and a separate post of chiffon cakes I've made - some decorated - some plain. :)

Looking back through my chiffon pictures on my blog - you can see where I have made a more successful Chocolate Chiffon!

Saturday, 9 June 2012

Chocolate Refrigerator Cake

Can't believe how quickly time passes!  My last Blog Entry was almost 6 months ago?!?!  Naughty me!

I will have to learn to write short posts and I dunno, edit photos so they are a collage of pictures in one post?  I hate waiting for the upload time :p

Chunks of moreish Refrigerator Cake :)


OK, this chocolate confection goes by many names: No-Cook Cake, Chocolate Tiffin, Chocolate Biscuit Cake (Prince William's favourite apparently), Rocky Road and of course, Chocolate Refrigerator Cake.  Needless to say, many names means many recipes.  I was inspired to make this after seeing a Facebook post from this lady, Jo Wheatley, winner of Great British Bake Off 2.  She has a Facebook page which I have been following.  Her picture of these decadent goodies made me want to make this...

When I make something, I now have an annoying habit of googling the name of the item and reading different variations of the recipe before I make my mind up which to follow.  If it's measured in grams opposed to cups, then I'm more likely to try it - just because I put my bowl on the digital scales and throw things in as I need to. 

I used this Annabel Karmel recipe as my base and used Jo's ideas to create my refrigerator cake.  It is delicious with crunchy and gooey textures and quite rich!

The chocolate mix turned out into my swiss-roll tin ready for chilling

Chocolate Refrigerator Cake

Ingredients:

150g/5oz milk chocolate
150g/5oz dark chocolate
100g/3½oz unsalted butter
150g/5oz golden syrup
small bag of Malteasers (honeycombe balls covered in chocolate 37g bag)
small bag of Minstrels (chocolate buttons encased in a candy shell 42g)
small bag of White Chocolate Buttons (70g)
8 biscuits (rich tea, ginger snaps, digestives, oat biscuits ~ any would work)
50g rice pop cereal
10 marshmallow lumps - quartered (could use mini-marshmallows too)

I made this cake with one bowl, one spoon.  Minimal washing up!  I put my bowl (microwaveable) on my digital scales and added things as I went along - it saved getting separate bowls messy and having lots to wash up :)

Break chocolate into pieces into a microwaveable bowl.
Add the cubed butter and the golden syrup to the bowl.  
Microwave at 100%  (mine is 800watt) for 30 seconds.  Take out and stir the contents.  If there are any remaining lumps of chocolate, microwave again for 15 seconds.  The mixture does not need to be hot, just warm enough to melt the chocolate.  Stirring continuously will help.
When the mix has all turned to liquid, tip in your Malteasers, Buttons, Minstrels, rice cereal, marshmallows and snap the biscuits up as you add them in too.  You can put these in a bowl and bash lightly with the end of a rolling pin if you like - but do not turn it into crumbs - lumpy is fine.
When everything is thoroughly coated in chocolate, tip out onto a shallow tray (I used 20cm x 30cm) lined with cling film (make sure there is excess cling film off the edges to wrap the cake).
Level out as best you can with the back of a spoon. 
Fold the excess cling film over the cake and place in fridge to set (1-2 hours).  Cut into small pieces.  It is quite rich so you do not need a big piece :)

I decorated the top of my cake with drizzles of white and dark chocolate before cutting it up :)
Melt one bar of white chocolate (100g).
Melt remaining dark chocolate left over from making refrigerator cake (50g) - left over milk chocolate is for stress-related emergencies >.<
Drizzle, squiggle, splodge the melted chocolate over the cake as your creative talents allow :)  Replce in fridge for a few mins to harden before chopping into as large/small pieces as you like :)

The beauty of this cake is you can adjust the ingredients as you like.  Add chopped dried fruit (raisins, apricots, dates, stem ginger, sour cherries, cranberries, list is endless...) and nuts (hazlenut, brazil, pistachio) if you prefer.  Or soak the dried fruit in alcohol for 24 hrs prior to making this if you want it to be an adult-only treat!

See the soft, gooey marshmallow, crisp, crunchy Malteaser?


Bagged and ready as a birthday gift to my neighbour :)


Sunday, 6 March 2011

Birthday Cake - Mango & Strawberry Flower

I've just finished making the birthday cake for my niece's 2nd birthday.  The celebration will be tomorrow.  Technically, in around 12hrs time, but I always call it tomorrow if it's the early hours and I've not had my sleep yet.

I'll try and remember to take pictures of the yummy Vietnamese food my SIL & her auntie will prepare, but I often forget!

Here's the finished cake!


Don't even ask me where I'm going to put the candles!!!!

As you can see, I'm quite glad I didn't put the candles in yet as the cake only j-u-s-t managed to fit into the fridge!!!!


I took plenty of photos whilst cake making - including the errors I made and I'll do a post soon of how I made this cake.

Happy Virtual Feasting!

Wednesday, 27 October 2010

Macaron Madness!

Bite-sized tea-time treats

I'm obsessed with the baker's arch enemy - The Macaron!  Notice the spelling - one 'o'.  The single 'o' spelling of macaron is normally used to describe the french confection of two meringue and almond discs sandwiched together with buttercream, ganache or jam.  Macaroon, however is known in England as a coconut or almond small baked confection.

You do get more than that in each pack, I've just eaten half the pack!

It appears that these dainty and colourful creations (french macarons like Lauduree or Pierre Hermes) are popular in blogosphere at the moment as well as being a hit outside in major cities all around the world.  They are made from sugar, icing sugar, ground almonds and egg whites and are exceedingly difficult to get right.  I've gone through a craze of sitting up late at night reading blog after blog about macarons, the best recipes, different fillings, flavours, what went wrong......  Now I've never even eaten one of these pretty pastel coloured confections but I must make some!  I tried.  I failed.

I heard Waitrose were stocking these in packs of twelve to buy (where I heard that I forget now, too many blogs, too many sites!), so off I popped to the shops yesterday (it was wet and drizzly too) in search of these little treasures.  Nope.  My local didn't have these on offer but I did find the English equivalents, both the Coconut and Almond Macaroon. 

Soft chewy centre full of almond flavour

Moist sweet coconut - for the exceptionally sweet-toothed!
My fave has to be the Almond Macaroon.  Looking like a crunchy cookie it's deceptive as you bite into that crisp exterior that gives way to a soft chewy centre with a flavour reminiscent of marzipan but less dense.  It's usually has a thin edible rice paper sheet lining it.  The coconut cousin however, is a much, much sweeter affair.  A rough, rocky lump of lightly browned coconut which is very slightly moist in the middle, like eating a Bounty Chocolate bar without the thick chocolate covering.  I now recall making these coconut delights when younger.  My mum said I was never to make them again as they were far too sweet.  Afterall, it consisted of mixing egg white, sugar and desiccated coconut together before dropping rough heaps on a tray to bake.

Dense chocolatey gooeyness

So, what went wrong with my macarons?  Well, I saw a chocolate macaron recipe and thought the bitter chocolate would take away the sweetness of egg whites and sugar.  I anticipated a fail and so split the recipe in thirds.  On mixing the meringue with almonds, cocoa and sugar I knew something was wrong.  The mixture was far too dry.  So I quickly whisked up another egg white to combine with the mixture.  Maybe I got my sums wrong when scaling down the recipe?  I checked if I was being a scatter brain.  Nope.  I guess it may be down to the eggs being on the small side (they're from our own hens) or me getting the method wrong.  The mixture still seemed thick and it didn't make me think of flowing magma like other blogs described.  I won't use the words I thought the lumpy brown mix looked like, never-the-less, I dropped blobs on a baking sheet to bake anyway and wished for a miracle to happen.  Hmmm....well, they kinda cooked.  They aren't right at all.  It's deep dark and chocolaty but not crisp and chewy.  Just moist and gooey.  Actually, I think I've invented chocolate flavoured marzipan as that what it reminds me of.  Ho-hum.  Back to the drawing board and I will summon up the courage to try making these elusive babies another time. 

Thursday, 7 October 2010

Chocolate & Date Sandwich Cake

Being on Maternity Leave means I have time to catch up with friends for lunch.  You would think I should have all the time in the world - somehow time flies even quicker with demands of a baby to pander to.  Anyhow, I love to bake, have done since I was little.  So, with the offer of lunch at a work colleague's house, what better excuse to put the pinny on and whip up a cake?

Woah!  Oozy cream and chocolate spread escaping!


This cake is from: 200 cakes and bakes ~ Hamlyn all colour cookbook

Chocolate & Date Sandwich Cake

This is what the hubbs left but subsequently ate for lunch!
150 g (5 oz) ready-chopped dried dates
150 ml (1/4 pint) boiling water plus 6 tablespoons
50 g (2 oz) cocoa powder
150 ml (1/4 pint) sunflower oil
3 eggs
175 g (6 oz) caster sugar
175 g (6 oz) self-raising flour
1 1/2 teaspoons baking powder

150 ml (1/4 pint) double cream
150 g (5 oz) fromage frais
3 tablespoons chocolate spread
5 bought chocolate truffles, halved


 Simmer dates in a saucepan with the 150 ml (1/4 pint) boiling water, covered, for 5 minutes until softened.  Gradually mix the cocoa powder with the remaining 6 tablespoons boiling water until smooth.  Leave the dates and dissolved cocoa powder to cool.

Add the oil, eggs and sugar to the dissolved cocoa powder then whisk together until smooth.  Add the flour and baking powder then whisk again.  Stir in the cooled dates and any cooking liquid and mix well.

Divide the mixture evenly between 2 x 20 cm (8 inch) sandwich tins, greased and base-lined with oiled greaseproof paper and spread the surfaces level.  Bake in a preheated oven, 180 C (350 F), Gas Mark 4, for 20 minutes until well risen and the cakes spring back when gently pressed with a fingertip.

Leave to cool in the tins for 5 minutes the loosen the edges, turn out on to a wire rack and peel off the lining paper.  Leave to cool completely.

Whip the cream until softly peaking then fold in the fromage frais.  Put one cake on to a serving plate, spoon over chocolate spread then half the cream.  Top with the second cake and spread with the remaining cream.  Decorate with the halved chocolate truffles.


I used 7 inch shallow sandwich tins so managed to bake three cakes.  Two of which were used to make the cake and the other just cut in half and sandwiched with chocolate spread and cream to make a half moon shaped cake.  This was for my hubbs.  He likes cake and especially chocolate ones!  I had some home-made choc & mint truffles in the freezer that I got for my birthday so these were defrosted and used for the cake.


Sorry about the disposable plate - it was for transportation to friend's house!

Saturday, 2 October 2010

Orange Chocolate Chip Bread 香橙巧克力麵包

I've not yet baked this, but those who've read the previous posts on bread will understand 70% of this bread dough is started 17 hours ahead and left to prove in fridge.  (Edit: bread baked 03 Oct ~ photos and comments added below.)


Orange Chocolate Chip Bread 香橙巧克力麵包

Pre-ferment Dough
bread flour          70%          462g
water                  40%          264g
fresh yeast           2%            13g
sea salt                1%            7g
skim milk powder 2%           13g

Dissolve the yeast in water.  Add bread flour, sea salt, skim milk powder and knead until soft.  Cover the dough in cling wrap.  Refrigerate to let it prove for 17 hours.

Dough
bread flour              30%          198g
skim milk powder     3%            20g
sea salt                     1%              7g
sugar                       10%           66g
water                       2%            13g  (I didn't bother with the water as it's only a small amount)
egg                           6%           40g
orange marmalade   24%        158g  (Mine was an Orange & Tangerine Marmalade)
fresh yeast               1%             7g
unsalted butter         8%           53g

Filling 
100g chocolate chips  (I used dark chocolate chips)
2 pc grated orange zest or glace orange peel  (I had a tub of whole candied clementines I'd bought from France a few years back.  I chopped one clementine for the bread (50g).  Next time I would double this as it disappeared in the loaf.)


  • Cut the pre-ferment dough into small pieces.
  • Knead all ingredients together (except the butter, chocolate chips and the orange zest).  Add pre-ferment dough piece by piece.  Knead after each addition until soft and smooth.  Add butter, chocolate chips and the orange zest. Knead until stretchable consistency
  • Put the dough into a big bowl.  Cover with cling wrap and let it prove for about 25-30 minutes.  (I left mine in a mound on a board and covered with oiled cling film.)
Looking just swell.

  • Divide the dough into thirty-six small equal portions.  Flatten to drive out the air. Roll them into balls.  Set aside to rest for about 20 minutes.  (The weight of my dough came to approx 1550g.  I rolled 15x50g balls to fit in one loaf tin and hand squared 8x100g pieces of dough to fit in the other tin.)


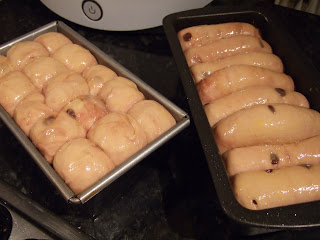
  • Flatten and roll them round again.  Place nine dough balls into a square tin.  Cover with cling wrap.  (The author used 4 small square tins that she called  mousse tins.  I used the two 1lb loaf tins I have.)

  • Let it prove again for about 40-45 minutes or until the dough has risen to 80% of the depth of the loaf tin.  (I added egg wash on the top of my breads before baking for a shiny finish.)  Bake in a pre-heated oven at 170-180 deg C for about 30-35 minutes.
Puffed and proven, ready for the oven.  The rolls on right look like fat sausages!

    Notes
    Baking chocolate can stand high heat.  It doesn't melt in the baking process.


    This is the recipe from Kin's book, Natural Breads Made Easy.  (天然麵包香 ~ 獨角仙@藍色大門.)  I am in the process of making this and will finish the post with my results tomorrow including any findings and photos.  :0)

    Natural Breads Made Easy.  (天然麵包香 ~ 獨角仙@藍色大門.)
    Bread Bake Off Update:

    I made a couple of boo-boos (a silly error - or in my case, THREE boo-boos,) when making this bread.  Firstly, when I had incorporated the pre-ferment dough to the dough mix, I thought the dough was too wet and sticky so I added a tablespoon of flour.  Then another and another.  I still had a sticky chewing gum type mass in the bowl - not elasticy and stretchy at all.  Then I realised I'd forgotten to add the butter, choc chips and candied orange!  The addition of butter usually makes the dough less sticky and easier to work with.  The fear of adding too much flour is that the ratio of flour to water is altered and can result in a tough, drier bread.

    My second boo-boo was not greasing the loaf tins properly.  One has a non-stick finish so no probs there.  The other tin was probably not greased carefully enough and the sides of the bread stuck to the pan!

    Now, I'm not entirely sure what I did wrong but the bottom of the loaves are indented.  It looks like the dough did not touch the bottom of the tin.  I don't know whether that was me not putting the dough in very well into the tins or whether I took the bread out to early to see if it was ready.  I baked as instructed for 30 minutes and tipped the longer loaf out to tap the bottom.  I was surprised to see the bottom of the dough did not touch the bottom of the pan and so was soft and spongy.  A hollow sound when tapped indicates the bread is cooked.  The breads were already looking rather browned on top so I lowered the shelf and turned down the heat a little.  I baked for a further 15 minutes.  This time I checked the shorter loaf tin.  This bread was stuck to the sides.  (Did I forget to grease this?)  Again it had a puckered base.  Into bake again for a further 15 minutes.  They looked finally ready although the bases still hadn't recovered fully.  Have not seen this before and not sure what had caused it.  Still sliced and tasted lovely.  Love the dark choc chips in the loaf but I'm not sure where the candied clementine went?  I would add another candied clementine next time and go easy on adding more flour.  The bread has a good chew to it may be a result of the flour I was adding.   Maybe you'll do a better job than I did!

    My blog friend Everybody Eats Well In Flanders made this in tandem this weekend as I posted the ingredients and recipe before I completed the loaves so she could bake it too.  Her hand-held mixer died on her in the process but she still made an excellent loaf.  Her version she called Orange Marmalade Loaf as she omitted the chocolate chips.


    Bread is slightly over fired but it gave it a nice crunchy crusty top.


    Not sure what I did wrong but the base of the bread is puckered.


    Despite my errors, the bread does have minute bubbles running through it.