Monday 31 December 2012

Green Tea Chiffon


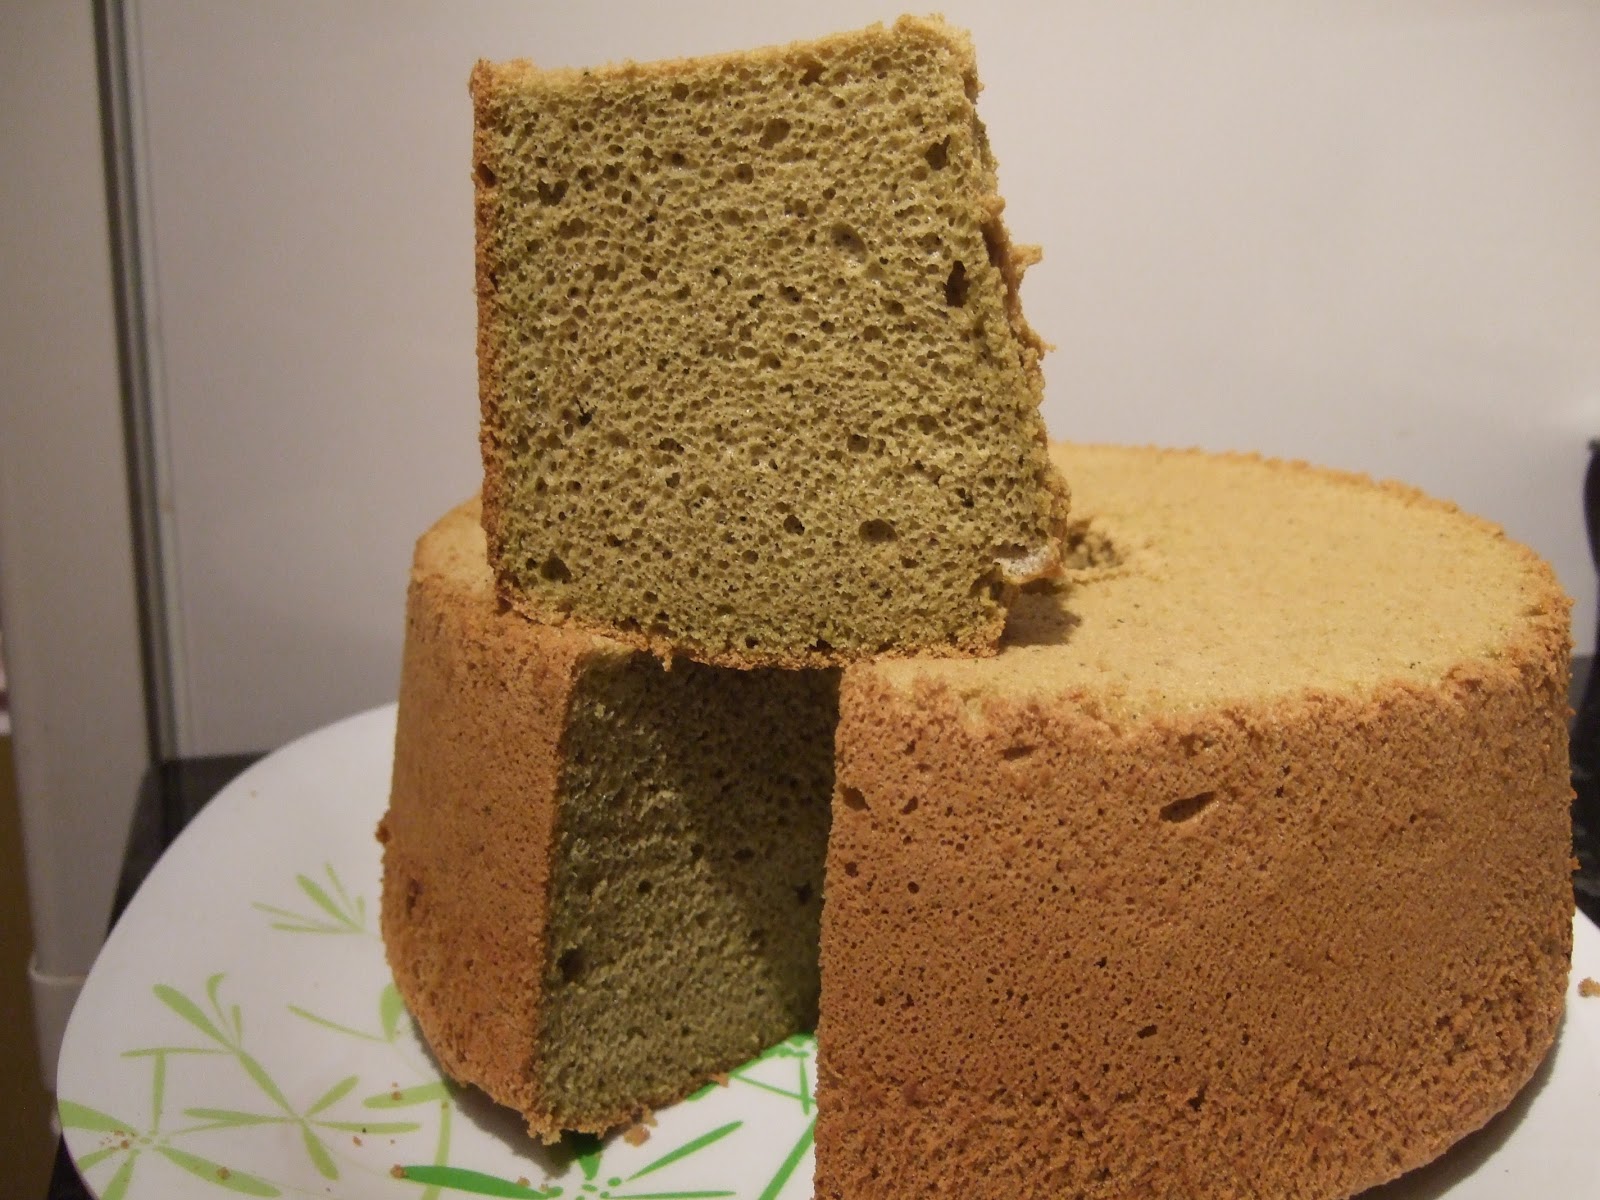
We were invited to my cousin's for a Post-Christmas Steamboat/Hot Pot dinner so I thought I'd whip up a cake.  I decided on a chiffon cake as I wanted it to be light, fluffy and not overly sweet.  I decided on Japanese Green Tea as my flavouring and set to work on looking for a recipe.  I used this one here to base my recipe on.

Green Tea Chiffon Cake 


6 large free-range eggs (separated)
150g caster sugar
1/4 tsp cream of tartar
60ml sunflower oil
30ml cold water
30ml milk
120g self-raising flour
3 level tsp ground green tea powder


Sift the flour and green tea powder together 3 times and set aside.  Weigh out 100g the caster sugar and place in a small dish/saucer.

Place the 6 eggs whites in a scrupulously clean, grease-free bowl and whisk until large bubbles form.  Sprinkle in the cream of tartar and continue to beat (I use the whisk attachment of my hand blender) until white and fluffy.


Add 100g of the caster sugar a quarter at a time into the whites and beat in fully before adding another quarter.  When the 100g sugar is added, continue to beat until the whites are glossy white and are fairly stiff. The whites need to be able to hold their shape and will not fall out of the bowl if the bowl is upturned.

Add the remaining 50g caster sugar to the 6 egg yolks and beat until thick.  Add in the oil and beat for a couple of minutes more until it is incorporated.  Add the milk and water and mix in (it does turn back to liquid.)  Sift in the flour and green tea powder and mix in until there are no traces of flour left.

Scoop a quarter of the egg white mix into the cake batter and mix in to loosen the batter.  Take another quarter and fold in lightly with a large metal spoon.  (I use a large plastic serving spoon.) Continue with the remaining egg whites folding in so that the whites mix into the batter but be careful not to knock the air out.

Pour the mixture into an ungreased chiffon tin (mine is 23cm wide at the top and 20cm wide at its base).
Bake at 170 C for 45-55 minutes.  The chiffon will be ready when a skewer poked into the cake comes out clean with not wet sticky mix on it.  If cake browns too quickly, lower the temperature slightly and continue to cook.

Invert the cake immediately to cool.  (I balanced the central tube of the pan on a small tin.) Remove the chiffon cake when it has fully cooled.

***Notes:
I would reduce the sugar next time to 130g and increase the green tea powder to 5 level teaspoons as although it looked nice, the taste was quite mild.


Happy 2013 !

A simple design of ice blue fondant and sparkly snowflakes.
(Photo does not reflect the true colour or the sparkly effect )


A fun snowball scene
Crikey! How time flies!

Three years ago I started this blog to record my odd ramblings, my son growing up, my baking endeavours and gardening adventures.  Garden hasn't had a lot of exposure on here - probably due to a lack of me being in it! Baking, well - I'm always in my kitchen baking away :p

Here's a look back at our Christmas 2012 seeing as I was too busy baking to stop and blog :(


No icing or marzipan for this one - dried fruit and nut topping


Gold Star Wreath
I made several Christmas Cakes this year to gift to friends and family. Each one has been decorated differently and it was a joy to do!


Home-made mincemeat and home-made gluten-free pastry

I had a pre-Christmas Meet with some of my Mummy friends - we met because we were expecting our little people 2 or so years ago and have stayed firm friends and our little ones play together too!  One of my friends is gluten intolerant and vegetarian so I made these Gluten-Free Mince Pies so she could indulge in the festive season!


The package on right is Gluten-Free Biscotti ~ Apricot and Almond
I do like to bake and share so I have been biscotti crazy again this Christmas concocting different combinations of fruits and nuts into biscotti so I can package and give to friends.  It certainly guarantees a smile on people's faces!


It was fun decorating these trees with my son 
I try not to leave the little people out where I can so I made some Gingerbread Trees and People for a few of my friends - oh and of course, for the little person here too :D  Although I secretly think my son enjoys the  "Smarties" (Chocolate Beans) more than the gingerbread itself! 


My personal project this Christmas was to create a Gingerbread Scene - 3D of course!

My Gingerbread Display I made for my son and niece - we ate the gingerbread after Christmas!


Thank you to you all for reading!
May 2013 bring you much baking / cooking / crafting / gardening adventures!


Wednesday 28 November 2012

Steamed Cake - Mini Vanilla Cakes

Having been invited by Miss B of Everybody Eats Well in Flanders to enter the Aspiring Bakers Steaming Hot Cakes Event, I have been thinking of what to make.  I've never attempted a steamed cake before and am assuming most cake recipes work whether you bake or steam?  Although cooking times may vary I'd imagine.


Recently, I've been baking biscuits or baking Madeleines and even bread or buns.  I had Kenwood Mixer out today so I thought I would whip up some Madeleines for my son - he loves his "Boat Cakes".  My Madeleine mould would not fit in my largest pot/wok so I decided to use silicone cake cases & steam them in a bamboo steamer over a wok.

I wondered if they'd be like Chinese Steamed Sponge: Ma-Lai Goh 馬來糕 but it is not nice, bubbly and fluffy like one.  I tink the Madeleine recipe is too dense for that kind of texture - too much flour.  Anyway, it has a nice flavour all the same and makes you think you are eating something healthy! (?!!)


Recipe is as pretty much similar to how I made Madeleines before.
Airy, but lacking big bubbles

Mini Steamed Vanilla Cakes

3 free range eggs
100g caster sugar
200g plain flour
10g baking powder
1 teaspoon Vanilla Extract
20g honey (I used a set honey but otherwise a runny one will be fine)
60ml milk
200g butter (melted, cooled)

Whisk the eggs and sugar in a large bowl until pale and thickened.


Add the milk and honey to the melted butter and mix.


Pour the melted butter mix into the egg batter but down side of bowl.  Be delicate with the whipped egg and air mixture! Add vanilla.


Sift in half the flour and baking powder and fold gently.  Sift in remaining flour and baking powder and fold.

Place a tablespoon of mixture into a small silicone cupcase.  Place the cases into a bamboo steamer and replace the steamer lid.  I used to lid to prevent condensation droplets making the cake tops soggy.  Steam over medium heat f or 15 minutes.


I am submitting this post to Aspiring Bakers #25 - Steaming Hot Cakes (November 2012) hosted by Miss B of Everybody Eats Well in Flanders.  Link HERE 


Thursday 15 November 2012

French Madeleines

Perfect little cakes for afternoon tea, with friends or for little fingers!

It seems that I have introduced a new favourite cake with my son - French Madeleines.  They are little shell-shaped cakes that are buttery and very delicious!  They usually have a characteristic 'bump' too - like a fat belly!  I struggle to achieve the bump on my cakes but they taste nice all the same!  Oh, and to my son, these shell-shaped cakes are "little boats" :)

The recipe I have used is adapted from BBC website "Madeleines with lemon curd" - but there are many around on the 'net.  Use whichever one you like the sound of :)


The closest I can get to achieving a "bump"

Orange Scented Madeleines


3 free range eggs
100g caster sugar
200g plain flour
10g baking powder
1 orange (grated zest)
20g honey (I used a set honey but otherwise a runny one will be fine)
60ml milk
200g butter (melted, cooled)

Whisk the eggs and sugar in a large bowl until pale and thickened.

Add the milk and honey to the melted butter and mix.

Pour the melted butter mix into the egg batter but down side of bowl.  Be delicate with the whipped egg & air mixture! Add the grated orange zest.

Sift in half the flour and baking powder and fold gently.  Sift in remaining flour and baking powder and fold.

Leave the batter to rest in the fridge for an hour or overnight.  (Not sure why - but different sites say it helps achieve the "bump" on the madeleines.)

If you are like me, you cannot wait to bake your little nuggets of buttery delights. ;)
So turn on oven to Gas 5/190C/375F.  While oven is heating up, butter and flour your madeleine tin.  I have a silicone ones in different sizes.  I also use a mini-teddy bear tin.  The flour is very important as it makes it easier for the cakes to fall out from the tin after baking.  Trust me on that one!  I made the mistake of only greasing the teddy bears one morning and YUP! Half the teddies stuck to the tin DESPITE it being "non-stick".

For my larger madeleine shells, I put about a dessertspoon of mix in each shell.  You are aiming for 80% full and not too worry about making it even as the baking levels it out.  For mini-madeleines or mini-teddies, then I go for a teaspoon of mix.

Bake for 7 minutes, then turn oven off for 5 minutes (apparently, this creates the "signature bumps" - mine do get a small bump not a great big one).  Turn oven back on but this time at Gas 3/160C/325F.  Bake for a further 7 minutes.  The shells should just be tinged brown on the outsides.  For my mini-sized moulds I bake 5 minutes, rest 5 minutes then continue with a final 5 minutes.  Cool the tin for a few minutes before turning out onto a cooling rack.  The silicone madeleines should fall out easily but a prod from the underneath helps any disobedient cakes.  For my teddy tin (as it's metal) a sharp tap on the cooling rack sends any teddies tumbling out of their beds!  (Provided I greased and floured the tin!)

Baking these little cakes in a metal tin gives a more evenly brown colour than in silicone


You can just make out the little bear's face 
A fat belly appearing on the bear!
I usually bake a batch of madeleines so my son can munch on them.  The remaining mixture is placed in a bowl, covered with cling film and is baked the following morning.  The tin should be washed and dried before re-greasing and flouring when baking another batch.

* Greasing and flouring.  I rub butter using fingers or a piece of buttery paper in the nooks and crannies of the tin.  I sprinkle flour in each indentation and shake the tin in every direction to coast the buttery surface with flour.  Finally tap any loose flour away.
With a silicone mould, I do the same buttering process but to distribute the flour I fold the silicone mould in half and shake/clap the mould to get the flour coated inside.  Shake any excess flour off before filling.

I have made these with lemon zest before and with green tea powder (I added about 1 teaspoon of ground green tea with the flour).  I haven't tried chocolate as yet but I would substitute 25g flour for 25g cocoa powder.


Wednesday 29 August 2012

Swiss Roll (filled with cream and fresh fruit)


I don't make Swiss Rolls because I am awful at them.  My late Grandfather (mum's side) was a baker and would make Swiss Rolls filled with Buttercream and sell them to the local Chinese Supermarket.  When he came to visit us I would love to watch him whip eggs sugar and flour into fluffy creations.  I did not possess his skills.

Determined not to resort to a shop-bought cake for hubb's (Mr Leaf) birthday, I was trying to come up with a cake that wouldn't be too sweet or too large.  Whilst internet browsing I came across a Raspberry Swiss Roll recipe by one of my favourite chefs James Martin.  I had intended to make this at my mother's yesterday (hubb's actual birthday) but was too busy.  So I set to work in the kitchen today.

I was pleased with the outcome as it did not crack or split on rolling :)  I didn't see bubbles of flour on the base of the swiss roll (as in previous efforts).  I hope my Grandad would be proud of me :)

My mum has raspberry bushes in her garden and they are in season now - I was going to put fresh raspberries in the filling with the cream but seeing as I forgot to pick any to take home I had to rumble in the fridge to see what we had.  This Swiss Roll is filled with Homemade Raspberry Jam, Vanilla Cream, White peach and Mango.


The sponge for the swiss roll is simple, just 3 ingredients; eggs, caster sugar and self-raising flour.  It's very light and spongy but is fat-free so does not keep well.  It is not as moist and pillowy as a chiffon either - makes the addition of cream and fruit seem less guilty! Heh Heh Heh!


Recipe for the Swiss Roll is here: http://www.bbc.co.uk/food/recipes/raspberry_swiss_roll_08757


Sunday 12 August 2012

Tiger/Giraffe Bread


I love Tiger Bread!  It's a loaf with a special coating on which you can get in the fresh bakery section of the major supermarkets here in UK.  A distinctive aroma which reminds me of toasted Marmite which means it's yummy in my opinion!  It has a lovely crackly crust which is usually on bloomer shaped bread.  I've seen a supermarket call its Tiger Rolls, Tiger Paws!  The baguettes are Tiger Tails of course! :D

One supermarket chain changed the name to Giraffe bread after a little girl wrote in saying it resembled giraffe more than tiger.  She's not wrong!


Seeing this recipe posted on Jo's Blue Aga, I had to give it a try.  I follow Jo on her Facebook page too :)  As well as entering her monthly baking competitions!


With a cupboard stocked with strong flour (for bread baking) and a fresh packet of dried yeast I thought I was good to go.  I assumed I had rice flour in but my luck was out.  Rice flour is the magic topping ingredient here too!  I had everything but that!  Plain flour; self-raising; gluten-free flour; tapioca flour; potato starch, glutinous rice flour and cornflour!  None of which I have seen suggested on the internet as a substitute for rice flour!

Determined to try Tiger Bread, I thought I'd grind my own.  First I used the food processor attachment on my electric hand blender.  Next, good ol' mortar and pestle.  Finally, the coffee grinder which has never ground a single coffee bean in it's life of sitting on the kitchen shelf looking pretty!  After sieving the flour through it resembled semolina you roll pizza dough out with.  I still gave it a try but only made a quarter of the  topping.  I used this to spread on one of my loaves which was proving nicely after my battle trying grind rice grains!  The other loaf I left plain in case the home-ground rice flour topping was a complete disaster!


The resulting bread was definitely not like the Tiger Bread you buy in shops.  It lacked the toasty aroma and I struggle to get the nice crunchy crust on my home baked loaves.  It also didn't crackle very much.  Despite all that, it was a very nice tasting loaf, soft and springy.  It's amazing what 'still within date' dried yeast can do compared with 'hiding in the cupboard too long' yeast can do!


Tuesday 7 August 2012

A Passion for Baking - Basic White Bread Competition


Competition Number 3 by Jo Wheatley of Jo's Blue Aga - and it's the Basic White Loaf, again from her book, A Passion for Baking.

This came in great timing as I fancied making bread and had just stocked up on strong bread flour (it has higher protein content which helps the structure of the loaf), shame I didn't have sense to buy some instant yeast as what I had in the cupboard had been knocking around for a bit :p  They say it deteriorates quickly and loses its ability to rise well.  *Shrugs*  Ah well :p

It was a simple recipe to follow and we had option of using stand-mixer or by hand.  Well, I pulled out my trusty Kenwood and made it work :p  I do have an almost 2 year old to entertain too you know! ;)

I was pleased with the small but evenly sized bubbles in my loaf - felt quite moist and springy too!

Maybe my shaping of the loaf before it goes in the tin needs perfecting as the bread rose unevenly during baking and resembled an odd shaped mushroom :p  I had forgotten how delicious the aroma of bread baking in the oven was :D  It was hard resisting temptation to slice into the loaf whilst warm - but I think that just tears the bread.

Oh, I can't cut fresh bread - I always managed to get wonky slices that resemble door wedges! :p  There is an upside to that that though, my correcting slice was too thin to be a regular slice of bread and so I sampled that with some butter and some home-made raspberry jam!  Ahem!  I mean I had to have a slice with butter and jam for the photo shoot of course!  *Wink Wink!*


MmmMMm!  Fresh bread!  YUM YUM!


* * *
I baked the loaf last Thursday but to spare you the suspense of waiting to find out who won, I have waited until today (Tuesday) to publish this post.  Winner was announced this morning - not my entry but I enjoyed taking part and seeing other people's entries :)

Winning loaf is here:

https://www.facebook.com/photo.php?fbid=429968647046652&set=a.210358729007646.49812.194356760607843&type=1&theater


Friday 3 August 2012

Christening Cake


Sometimes I get asked to make a celebration cake for a special occasion.  It's not very often and it's usually from someone I know.  I rarely decline the request as I feel it's good practise for me :)

I was lucky enough to make some really great friends when pregnant with my son and although we've only known one another for two years, we do not fail to meet up regularly.  I truly feel that we will stay life-long friends too!  I call these special girls my Mumma Friends.

Given the opportunity to make a cake for one of them gives me great pleasure and I was honoured to be the baker for the Christening Cake pictured above.  This Mumma Friend always gives me creative reign only specifying colour or a general idea.  Oh, and of course, choosing what type of sponge the cake is to be :)

This cake was made back in March and I'm struggling to remember what I'd filled it with!  If I recall correctly, it was a 10" round Vanilla Sponge, sandwiched with Vanilla Butter-cream (Swiss-Meringue) and quite possibly, home-made raspberry jam.  Covered in white fondant and decorated with fondant mini-roses and calla lilies.

Cake was a bit of a whopper in the end and really should have sat on a slightly bigger cake board - but then again, it wouldn't have fit in the box!  Technical details aside, friend loved it and that's what matters!


Thursday 2 August 2012

A Passion for Baking - Custard Cream Competition


Following Jo Wheatley's popular competition, she decided to host another!  This time Custard Creams (a biscuit sandwiched with vanilla custard) sweet but an old British classic :)   Again, the recipe is taken from her book, A Passion for Baking.

This was a fun recipe to do but I did find the biscuit dough tricky to handle.  My tip is to keep it between sheets of cling film to roll out. :)


These biscuits were a hit with my son (he's only an almost 2 year-old toddler and; quite the biscuit connoisseur!) and my mummy friends. :)


As you can see from the first two photos, they were taken outdoors.  I had forgotten part of the competition rules which stipulate the book must be present in the photo.  Hence, I had to do a second bake as it was only when I was about to upload my photo for the competition, that I discovered my error.  As luck would have it, the 'nice-looking' biscuits were eaten :p

The last photo is an indoor shot and I only just managed to get baked, biscuits arranged and uploaded before time ran out! :p  Even had me nipping out in darkness to snip a few lavender stems to prettify the photo!


A Passion For Baking - Cake Competition


Jo Wheatley is the winner of Great British Bake Off Series II (2011).
The show takes non-professional bakers and puts them through a series of challenges and each week a contestant is eliminated.  The next series is due to be aired in a few weeks time and I am looking forward to watching it!

Jo has recently published her book, A Passion for Baking and it's a well written book.  No long and fancy ingredient lists and most of all, I love it when the author adds a note about the recipe, whether it's one of a family member's favourite or a creation for a get-together with friends.  It is like the author is sharing a bit about their life and I like that friendly touch. :)

So, to celebrate her book launch, Jo hosted a competition ~ the prize was to win a day on one of her Masterclasses that she runs from her home.  We were to bake the Chocolate Birthday Cake from her book and include the book in the photo to show that we had followed her recipe.

Here was my take on it:


I made modelling chocolate with dark and then white chocolate which I used to hand make some roses, leaves and butterflies.  Modelling chocolate I've said somewhere else before is really odd stuff.  Its stiff and hard yet gets greasy when warm.  Not fun at all.
The cake was filled with chocolate ganache which piped in rosettes and attempted piped roses (like they do on cupcakes with butter-cream) I don't think my nozzle is quite the right shape :p  I decided last minute to make some  honeycomb (also known as cinder toffee, hokey-pokey).  This was fine except that overnight in a cake it kind of melts and ends up being like chewy toffee.

It was a great recipe but I think my execution was wrong.  I don't think my oven works that well and when I checked the cake after its allocated baking time it was definitely not ready.  I ended up over-baking it :(
Piped chocolate ganache swirls was a bad idea too as its pretty firm on cooling and it meant the cake was hard to slice.  The knife couldn't cut through the ganache and so would drag it down squashing the cake.  Perhaps I should have used a hot knife?

Nevertheless, I entered the competition.  I didn't win or get chosen as one of the six finalists.  The cake looked pretty though :p  Oh, I think it coincided with Father's Day as well as my neighbour's birthday so we shared some cake with our neighbour too :)


Wednesday 18 July 2012

Cherry, Almond and Apricot Loaf Cake


I wanted cake.  I needed cake.

Supermarket cakes just won't do.  On the occasion when I've wanted a small celebration cake and haven't had chance to bake, the resulting bought cake has not been too my liking.  Too sweet, not moist enough and usually too much sickly sweet butter icing.

Flicking through some of my favourite cake recipes and baking books I thought I'd bake a Cherry and Almond Cake.  I knew there was a tub of glace cherries in the cupboard and I always have a block of butter in the fridge for impromptu baking.

When it came to gathering ingredients, I discovered the glace cherry tub was already opened so I wouldn't have enough.  Hmm...what to do?  I found some dried apricots and so, Cherry, Almond and Apricot Cake was born!


Cherry, Almond and Apricot Loaf Cake


200 g butter (softened, but not melted)
175 g caster sugar
75 g ground almonds
Few drops of almond extract (optional if you like a stronger almond flavour, swap for vanilla if you prefer or omit)
3 large eggs
200 g self-raising flour
100 g glacé cherries (quartered)
100 g dried apricots (snipped into quarters or sixths)

Cream the butter and sugar together until the mixture is lighter in colour and fluffy.  (I like to do this by hand in a bowl and a wooden spoon as I find a hand-mixed cake has a lighter texture than if I use my stand-alone mixer.)

Add the ground almonds and the almond extract if using and mix in before adding eggs in one by one and mixing until just combined.  With the last egg, add a tablespoon from your measured flour when you are mixing it in.  It stops mixture from curdling which can result in a dense and heavier cake.

Toss the cut dried fruit with a tablespoon of your measured flour.  This stops the fruit from sinking.

Sift the flour into the cake mix and fold in with a large metal spoon.

Tip in the fruits and the remaining flour if any and fold in.

Spoon mixture into a greased and lined loaf tin (mine is a 2lb loaf size) and bake in a preheated oven at 170 deg C, Gas 3 for 70 minutes.  Cake should be well rise, golden and spring lightly when pressed with a finger.  If the cake wobbles in tin, then it is not ready.  Test cake with skewer ensuring no wet crumbs.

Cool in tin for 10 minutes before turning onto a cooling rack to finish cooling.


*     *     *

Cake was wonderfully moist from the ground almonds as well as being rich and creamy from the butter.  I think next time I might reduce butter to 175 g as some fruit still sank in my cake :p  I wonder if that's because when you are spooning mix in, the fruits tend to go in first and when I scrape bowl clean with spatula, its plain cake mix that tops the cake off?

My son loves this cake - although he won't eat the fruit.  :p  This cake disappeared in 2 days so I tried to make a similar cake with vanilla, white choc chips and fudge bits.  It didn't work.  The choc and fudge bits sank to the bottom and resulted in a chewy and sweet bottom layer :p  Son still ate it but hubbs (Mr Leaf) didn't take extra helpings.  The cake took longer to disappear too :p


Tuesday 17 July 2012

Rice Dumpling Wrapping Technique 粽子 (Mandarin Language)


Video is in Mandarin but method is quite clear.

This method starts with two leaves usually laid top to tail and the ends are often rounded off with scissors to make it look neater.  It's always smooth side up, rough side down.

Holding leaves horizontally in front of you, fold and twist from the middle so ends line up together like a tail and a cone shape is created.

Hold the cone in one hand whilst you use the other to fill the cone with rice, goodies (fillings) and then top
with more rice.

When your cone is filled, keep fore finger and thumb (of the hand holding the cone steady as the other hand brings the excess leaves (tail) to close the cone - like a lid.  The leaves at the sides are folded down and held under the fore finger and thumb and the end of the leaves are pinched (so they fold in half along it's length) where the edge of the cone is, then folded down to lie flat along the middle of rice dumpling.  (It's easier to watch the video several times than try and explain in words :s )

Then string or (traditional) re-soaked dried grass is used to wrap the dumpling firmly in the middle to keep leaves and filling in place.

Then boil in a large pot for 1-2 hours depending on the size of your dumplings and whether you use cooked fillings or have raw pork in it.  (Mum uses cooked fillings that she stir-fries together and is seasoned.  These can include: chicken pieces, chinese mushroom, lap cheong, char siu, chestnuts, re-soaked dried shrimp...)

5-Pointed Joong (Pyramid Shape) 五角粽


Video is in Cantonese.


As per request - I have been looking for more Joong Wrapping Techniques - this is a 5 pointed shape like a pyramid.  This style (shape and filling) is typical in South China, Guangdong I believe.  They tend to include split yellow mung beans (I think that's what they are?), a piece of fatty belly pork (sometimes seasoned with 5-spice) and some salted duck egg yolk.  The video must be a deluxe version as the lady has added dried shrimps and scallop!


This shape is similar to my mum's pillow-shaped joong except mum doesn't use two leaves twisted to make her base.  Mum's method is one leaf laid flat in palm of your hand, soaked (plain) glutinous rice spread in a thin and even layer, goodies (meaty fillings) laid on top, add sprinkling of chopped shallot, crushed roasted peanuts (if you wish- very tasty this way!) then finally a top layer of rice.  Bring the ends of the leaf to overlap in the centre.  First the top leaf, (hold down end with thumb) then fold bottom leaf up (again hold under thumb).  Next step is to get a small thin leaf to wrap the sides (just like lady in video) one leaf per side (left and right).  Then mum wraps joong with string.  She hold the loose end between her teeth then wraps the joong round and round the length of the joong to hold goodies in.


Sunday 15 July 2012

Birthday Cakes


Just a few pictures of some of the Birthday Cakes I've made...

This is a marbled vanilla and chocolate Rose Cake covered in Pink Strawberry Chocolate Ganache.
Sweet for a 9 year old's birthday :)


This was made for one of my friends.  As you can tell it was her daughter's 1st birthday.  I like when people aren't too specific with their cake demands as being a novice - I'm not sure what I can create!
This had the requirements of being pretty but not pink!  I enjoyed making this one - even cutting up a large rectangular cake into a number one shape! 
The cake is a fondant iced, vanilla sponge filled with home-made jam and buttercream. 

Close up of Butterfly and Daisy


This was a surprise for my husband's work colleague.  I wanted to try out a chocolate cake recipe and practice modelling chocolate for the first time.  Not sure I enjoy working with modelling chocolate.  Very strange substance.  Was the first time using chocolate pouring ganache but that was fun!

I have also made some novelty cakes in the form of characters - but I will have to find those photos :)
Oh, & I must find you photos from my son's first birthday - last year :p  He will be TWO soon!!!


Thursday 12 July 2012

Mrs Plum's Rice Dumpling (Joong)


I couldn't get a video of my mum's wrapping technique as she was never wrapping any whenever I was visiting.  (Maybe next year ;) )  Not making any myself this year I thought we were not going to get to eat any - luckily, on my recent visit to mum's I was gifted with 4 of these beauties to take home :)


These ones are Chicken and Chinese Mushroom fillings.  There is also the added dried shrimp you see there spilling onto the plate and I found sliced "lap cheong" Chinese Dried Sausage as well as chestnut.  The rice is wonderfully soft and sticky and I chose to eat mine with a splash of thick sweet soy Kecap Manis.  I think chilli oil would've been nice too :p

Hope you enjoyed your dragon Boat Festival and ate lots of tasty dumplings :p


Saturday 23 June 2012

Dragon Boat Festival 端午節


Dragon Boat Festival 端午節 is the 5th Day of the 5th month in the Chinese Calendar.  Usually falling in early June but this year it is today, 23rd June.

It means that there are sticky rice parcels to eat "Joong" in Cantonese 粽 - YUMMY!  Chinese isn't romanised well and you may recognise it as being Chung, Zong-Zi.  Basically it is a bamboo leaf wrapped parcel containing glutinous rice.  They can be savoury and filled with a variety of fillings some dependent on your region (salted duck yolk, mung bean and 5-spice pork belly is a common in Southern China - Guangdong).  You can also have a sweet variety where the rice is soaked in water with added alkali water.  When cooked the rice is yellow and you eat it dipped in sugar, syrup or have red bean paste in them.  Not my thing really.

My mum is a whizz at making Joong - but she makes what I describe a pillow shape.  I have not mastered this technique and I remember when I was younger, my mum going round to one of her friend's house to teach her a few of her friends how to wrap pillow Joong.  Not sure if she is making any this year as she has been busy with work.  I must video her technique so this skills are not lost!

In the meantime, here is a video of Joong wrapping.  This one is of a Pyramid shape which my mum wants to learn >.<   Will have to get her to watch this!  This video is in Cantonese :)

Happy Dumpling Festival!


Triangle Shaped Rice Dumpling

Tuesday 12 June 2012

Chiffon Cake Photos II


These are taken from the digital camera - hopefully better picture quality than the camera phone!


Here is a Gluten-Free Lemon Chiffon. I have a gluten intolerant friend and I made this cake as a treat for her.  She was having a stressful day decorating a 2-tier surprise birthday cake for her mum and I wanted to bring a smile to her.


This is the Mango Chiffon I created for my birthday.  It still stands fairly tall baked in a round springform tin despite not having a central tube to climb up on during baking.  I think this was a 9" cake.  It was also another gluten-free chiffon.


Ideally, I should've used more cream to top cake with but I wanted it to be not as sinful as I had a friend who was on a diet - too much cream and she may not even try it!


My gluten intolerant friend enjoyed the lemon chiffon so much she asked me to make another but fill it with cream, raspberries and strawberries for her partner's birthday.  I would like to have glazed the fruits but sometimes you have to go with what the customer wants!